Media Wall Design with AI: Full Room + Mood Board
Step-by-step guide: upload a mood board, let AI extract the design, and transform your living room with a luxury media wall in 15 seconds.
# How to Design a Media Wall with AI: Full Room + Mood Board
Most people design their media wall backwards.
They pick a TV size, buy a bracket, then stare at the empty wall wondering why it looks like a screen bolted to plaster. Six months later they're on Pinterest at 2 am searching "media wall ideas" and discovering that what they should have done was design the whole wall as a system — fireplace, storage, lighting, materials, proportions — before they drilled a single hole.
With the Aspire Interiors app, you can design that full room — media wall, fireplace, shelving, seating, lighting, flooring — in under five minutes, starting from a single mood board photo. Upload your room, upload an inspiration image, and the AI extracts the colours, materials, and textures. You get a complete, buildable design you can show your builder, your interior designer, or your partner.
This guide walks you through the exact process, step by step, with real screenshots from the app. If you're new to AI design, our complete guide to AI interior design covers the fundamentals first.
| Phase | Steps | What Happens | Time |
|---|---|---|---|
| Setup | 1–4 | Open app, upload room photo, select Media Wall, choose Full Room | 1 minute |
| Inspiration | 5–8 | Select "With Inspiration," upload mood board, AI analyses and populates design fields | 1 minute |
| Generate | 9–12 | Add manual details, generate, review before/after slider, view clean result | 2 minutes |
| Refine | 13–16 | Edit flooring, edit wall colour, view final design | 1 minute |
What You Need
Before you start, check you have everything. This is a five-minute workflow — but only if you're prepared.
- ✅ An iPhone — the Aspire Interiors app is iOS-only (for now). Android users can see our comparison of AI room design tools for web-based alternatives.
- ✅ A photo of your room — taken from a corner, in daylight, showing the full wall where you want the media wall. Include windows, doors, ceiling height, and any architectural features.
- ✅ A mood board or inspiration image — any photo that captures the aesthetic you want. A flatlay of materials, a hotel lobby, a Pinterest screenshot, a fabric swatch, even a piece of jewellery. The AI reads colours, textures, and materials from any image.
- ✅ Five minutes — that's the entire workflow from upload to final design.
- ✅ An idea of what you want — or just a gut feeling. The mood board handles the rest.
The Full Process at a Glance
Phase 1: Setup — Tell the App What You're Designing
Step 1: Open the App and Start Your Design
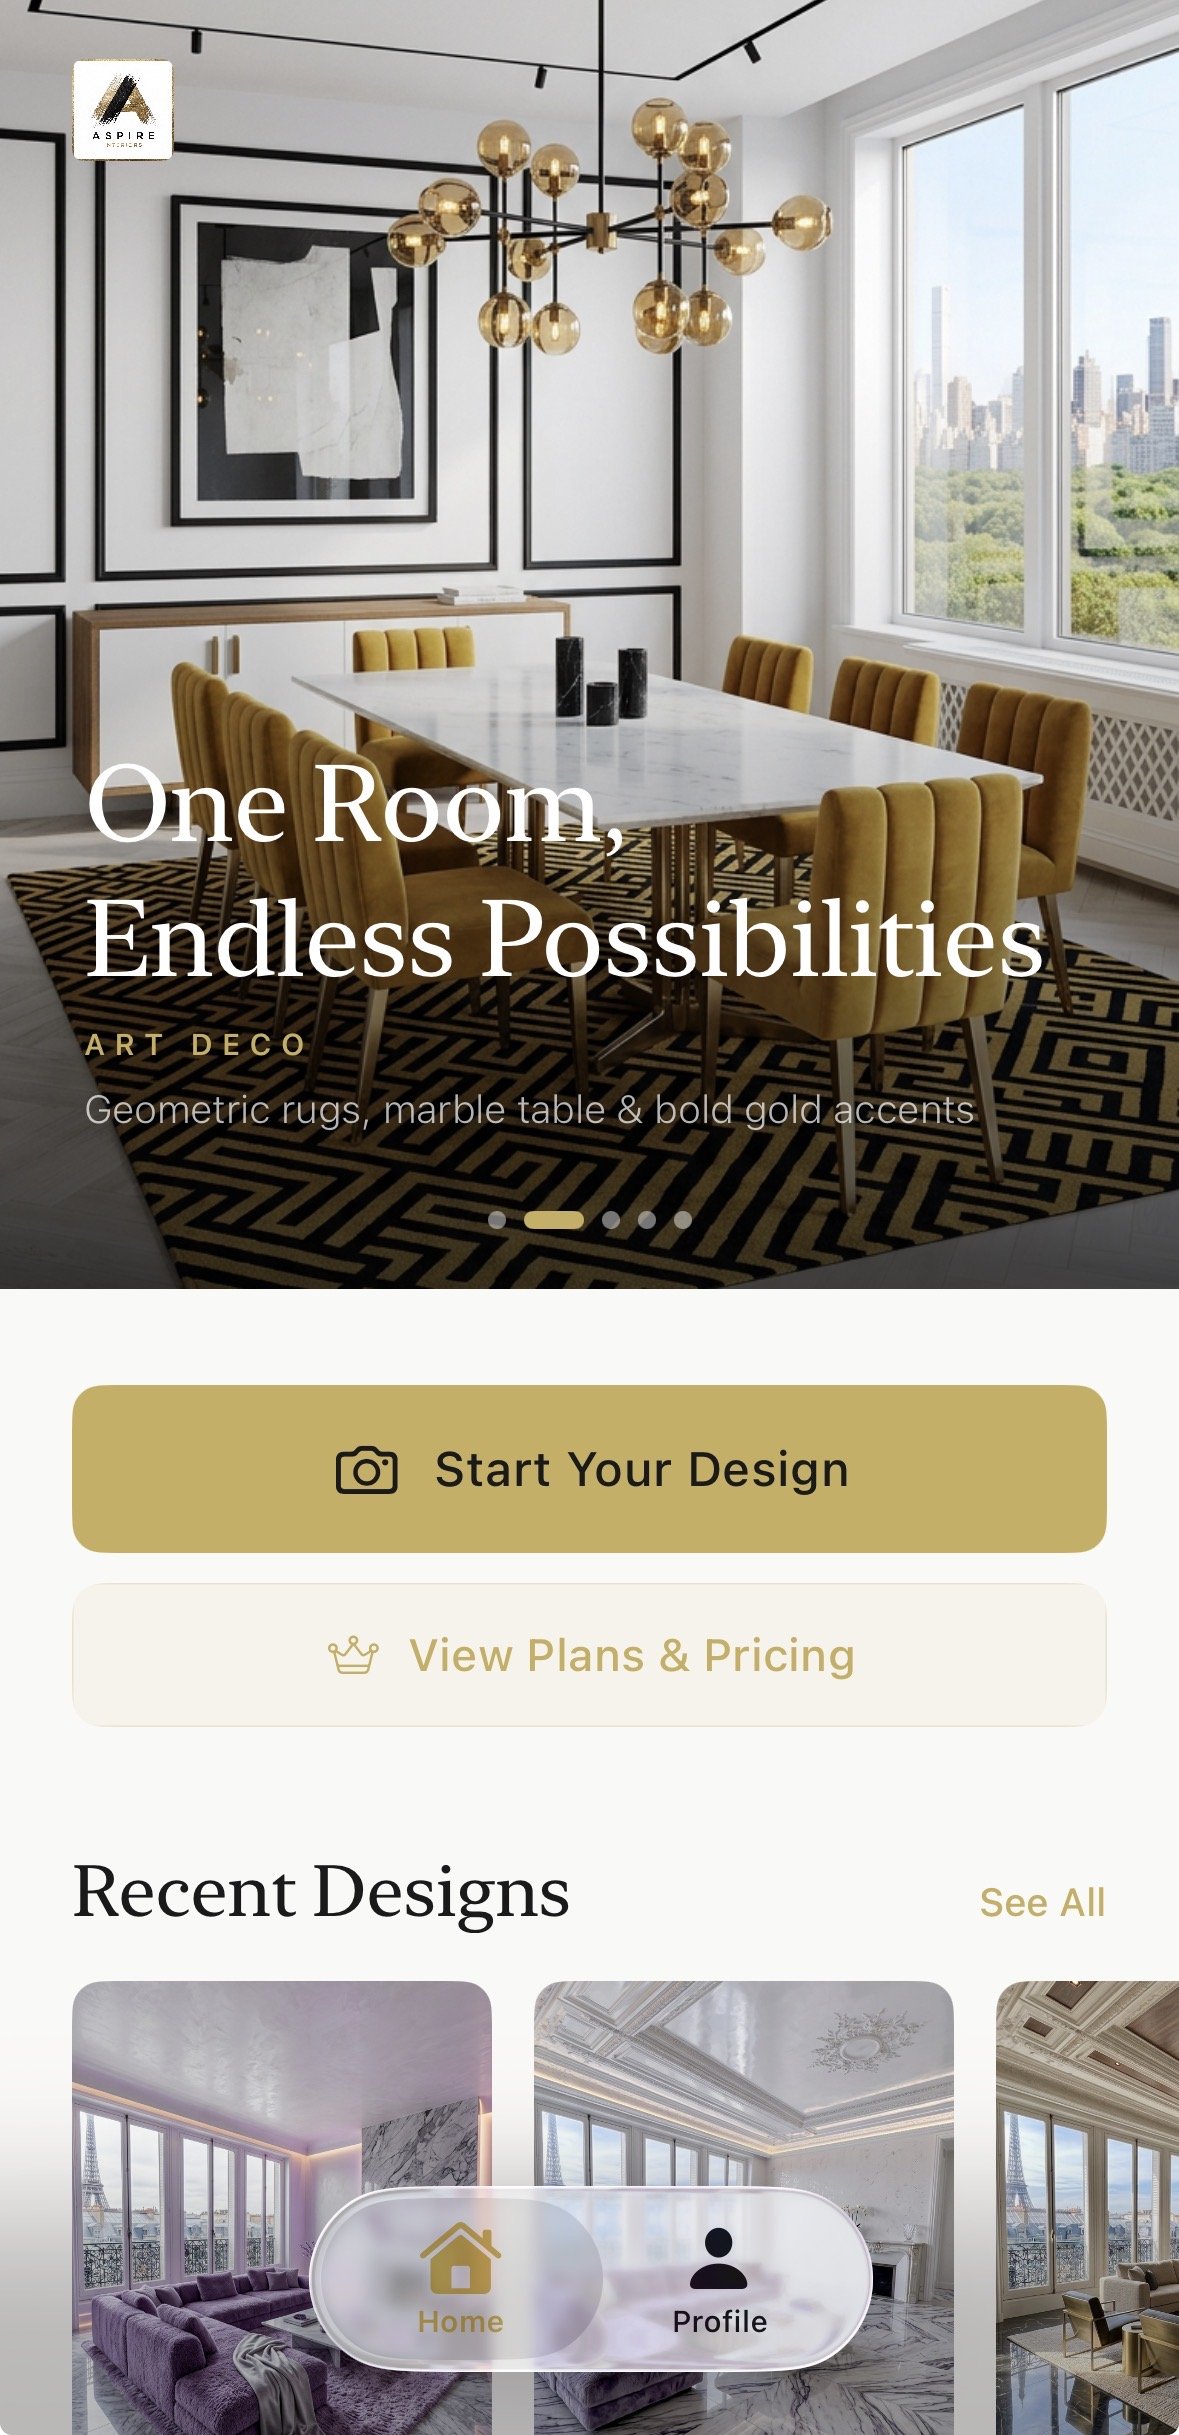
Open the Aspire Interiors app. The home screen shows a rotating selection of luxury room designs — Art Deco dining rooms, warm modernism living rooms, minimalist bedrooms. The aesthetic is immediately clear: this isn't a generic design tool. It's built for luxury interiors.
Tap the gold "Start Your Design" button.
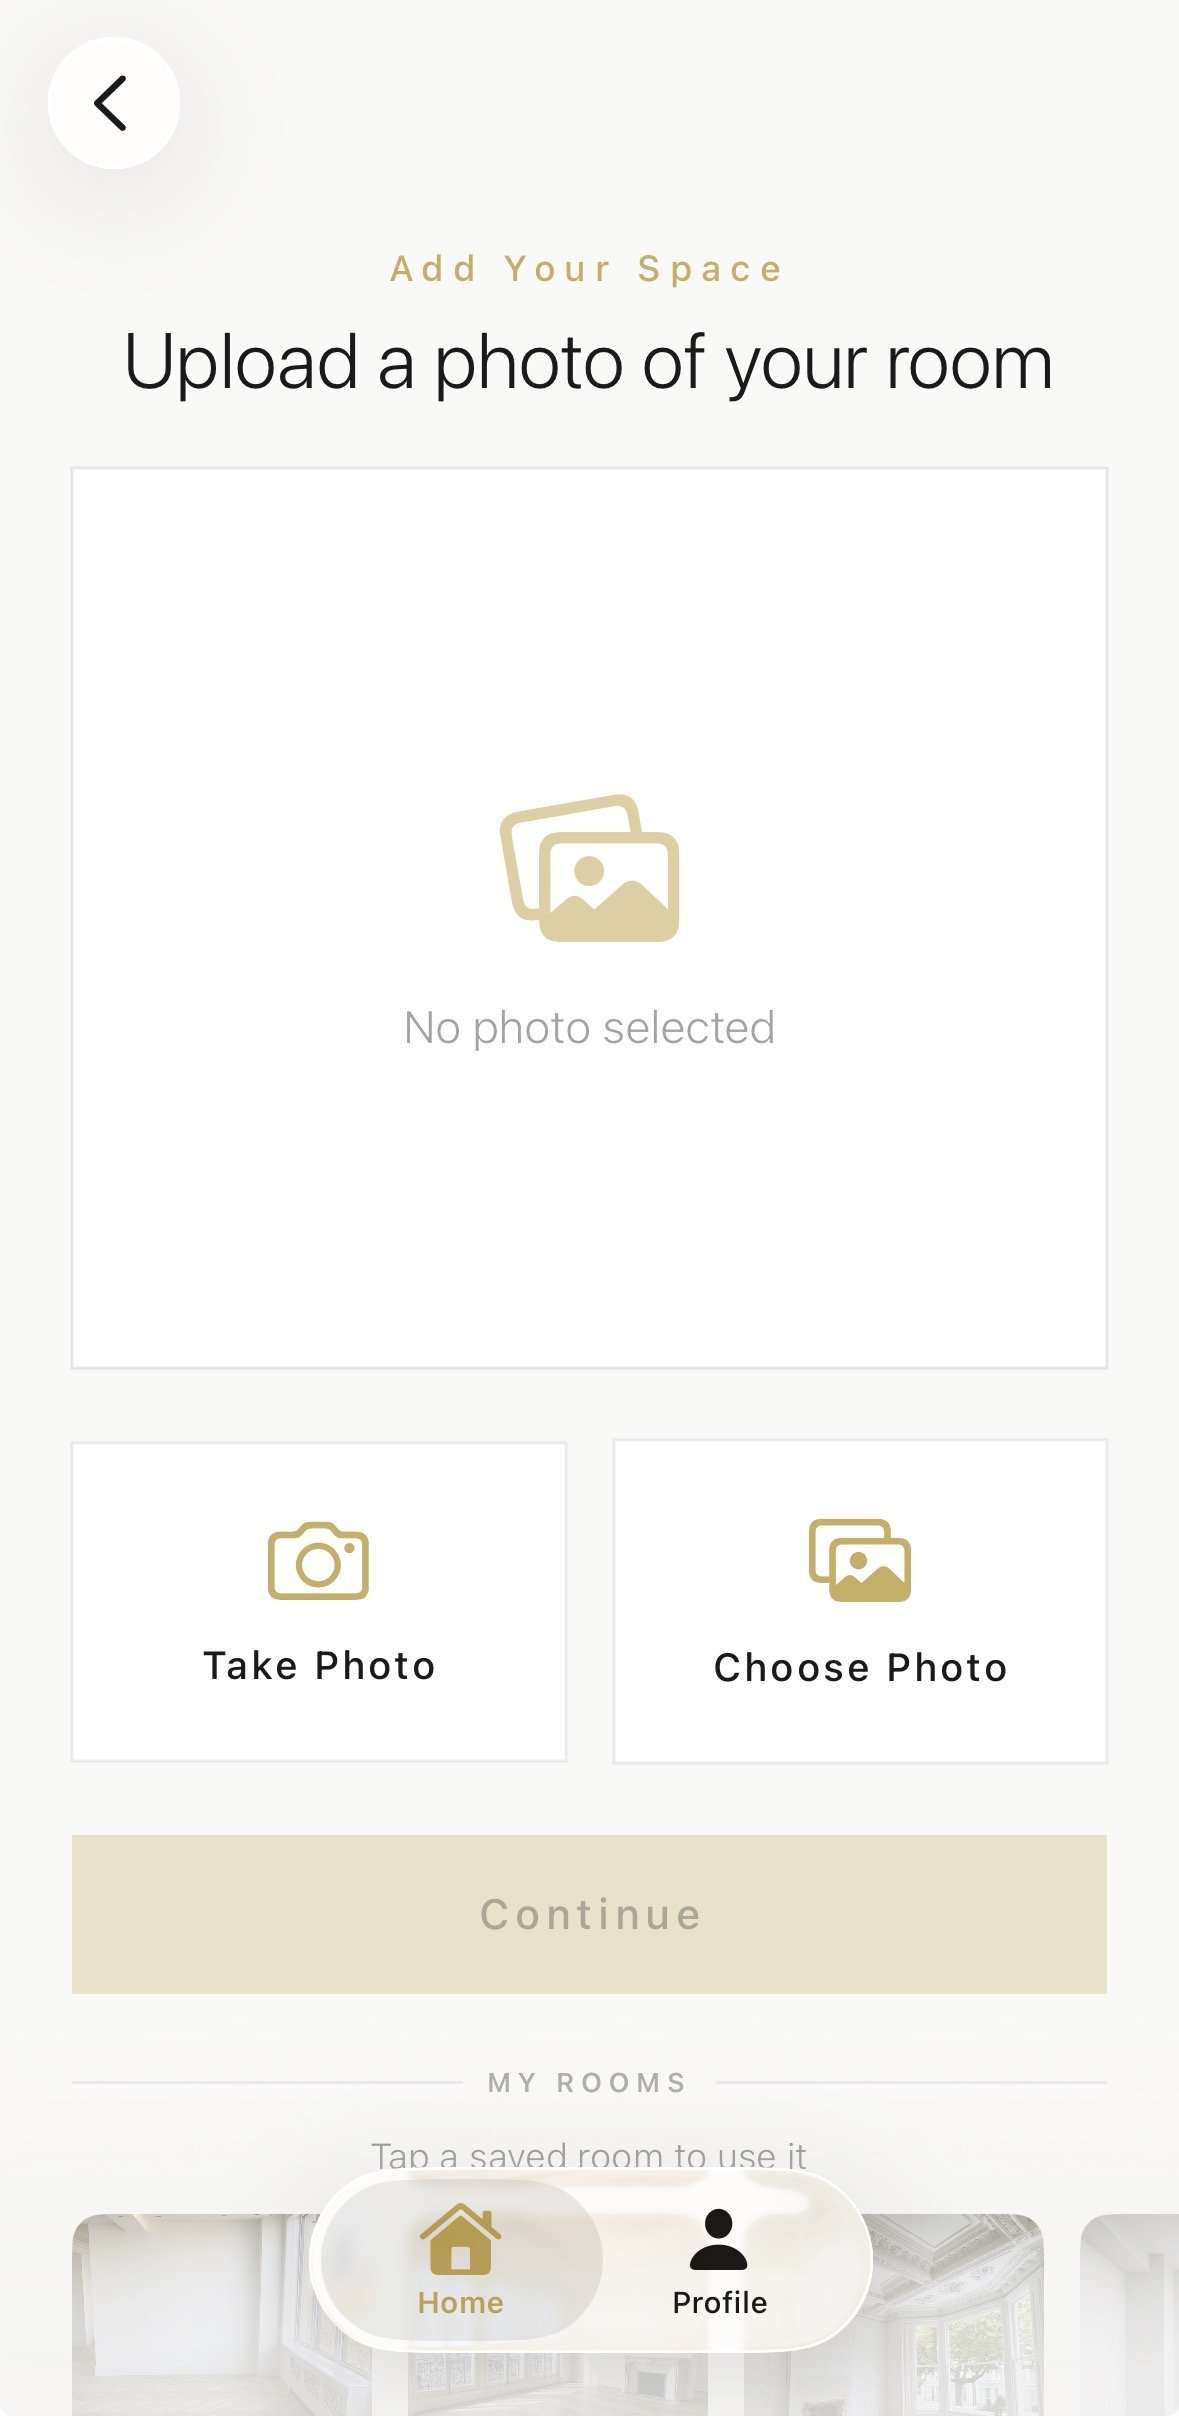
Step 2: Upload a Photo of Your Room
The app asks for a photo of the room you want to transform. You have two options: "Take Photo" or "Choose Photo."
Photo tips that matter:
- Daylight only. Natural light gives the AI accurate colour and proportion data. Turn on all the lights too, but avoid flash.
- Shoot from a corner. This shows the maximum wall and floor area. Stand diagonally across from the wall where you want the media wall.
- Include the ceiling. The AI reads ceiling height to scale furniture and the media wall proportionally.
- Show windows and doors. These are architectural anchors the AI preserves.
- Clear the clutter. The AI interprets everything in the frame as a permanent feature. That pile of laundry becomes a design element if you leave it in.
Select your photo and tap "Continue."
Step 3: Select "Media Wall" as Your Design Focus
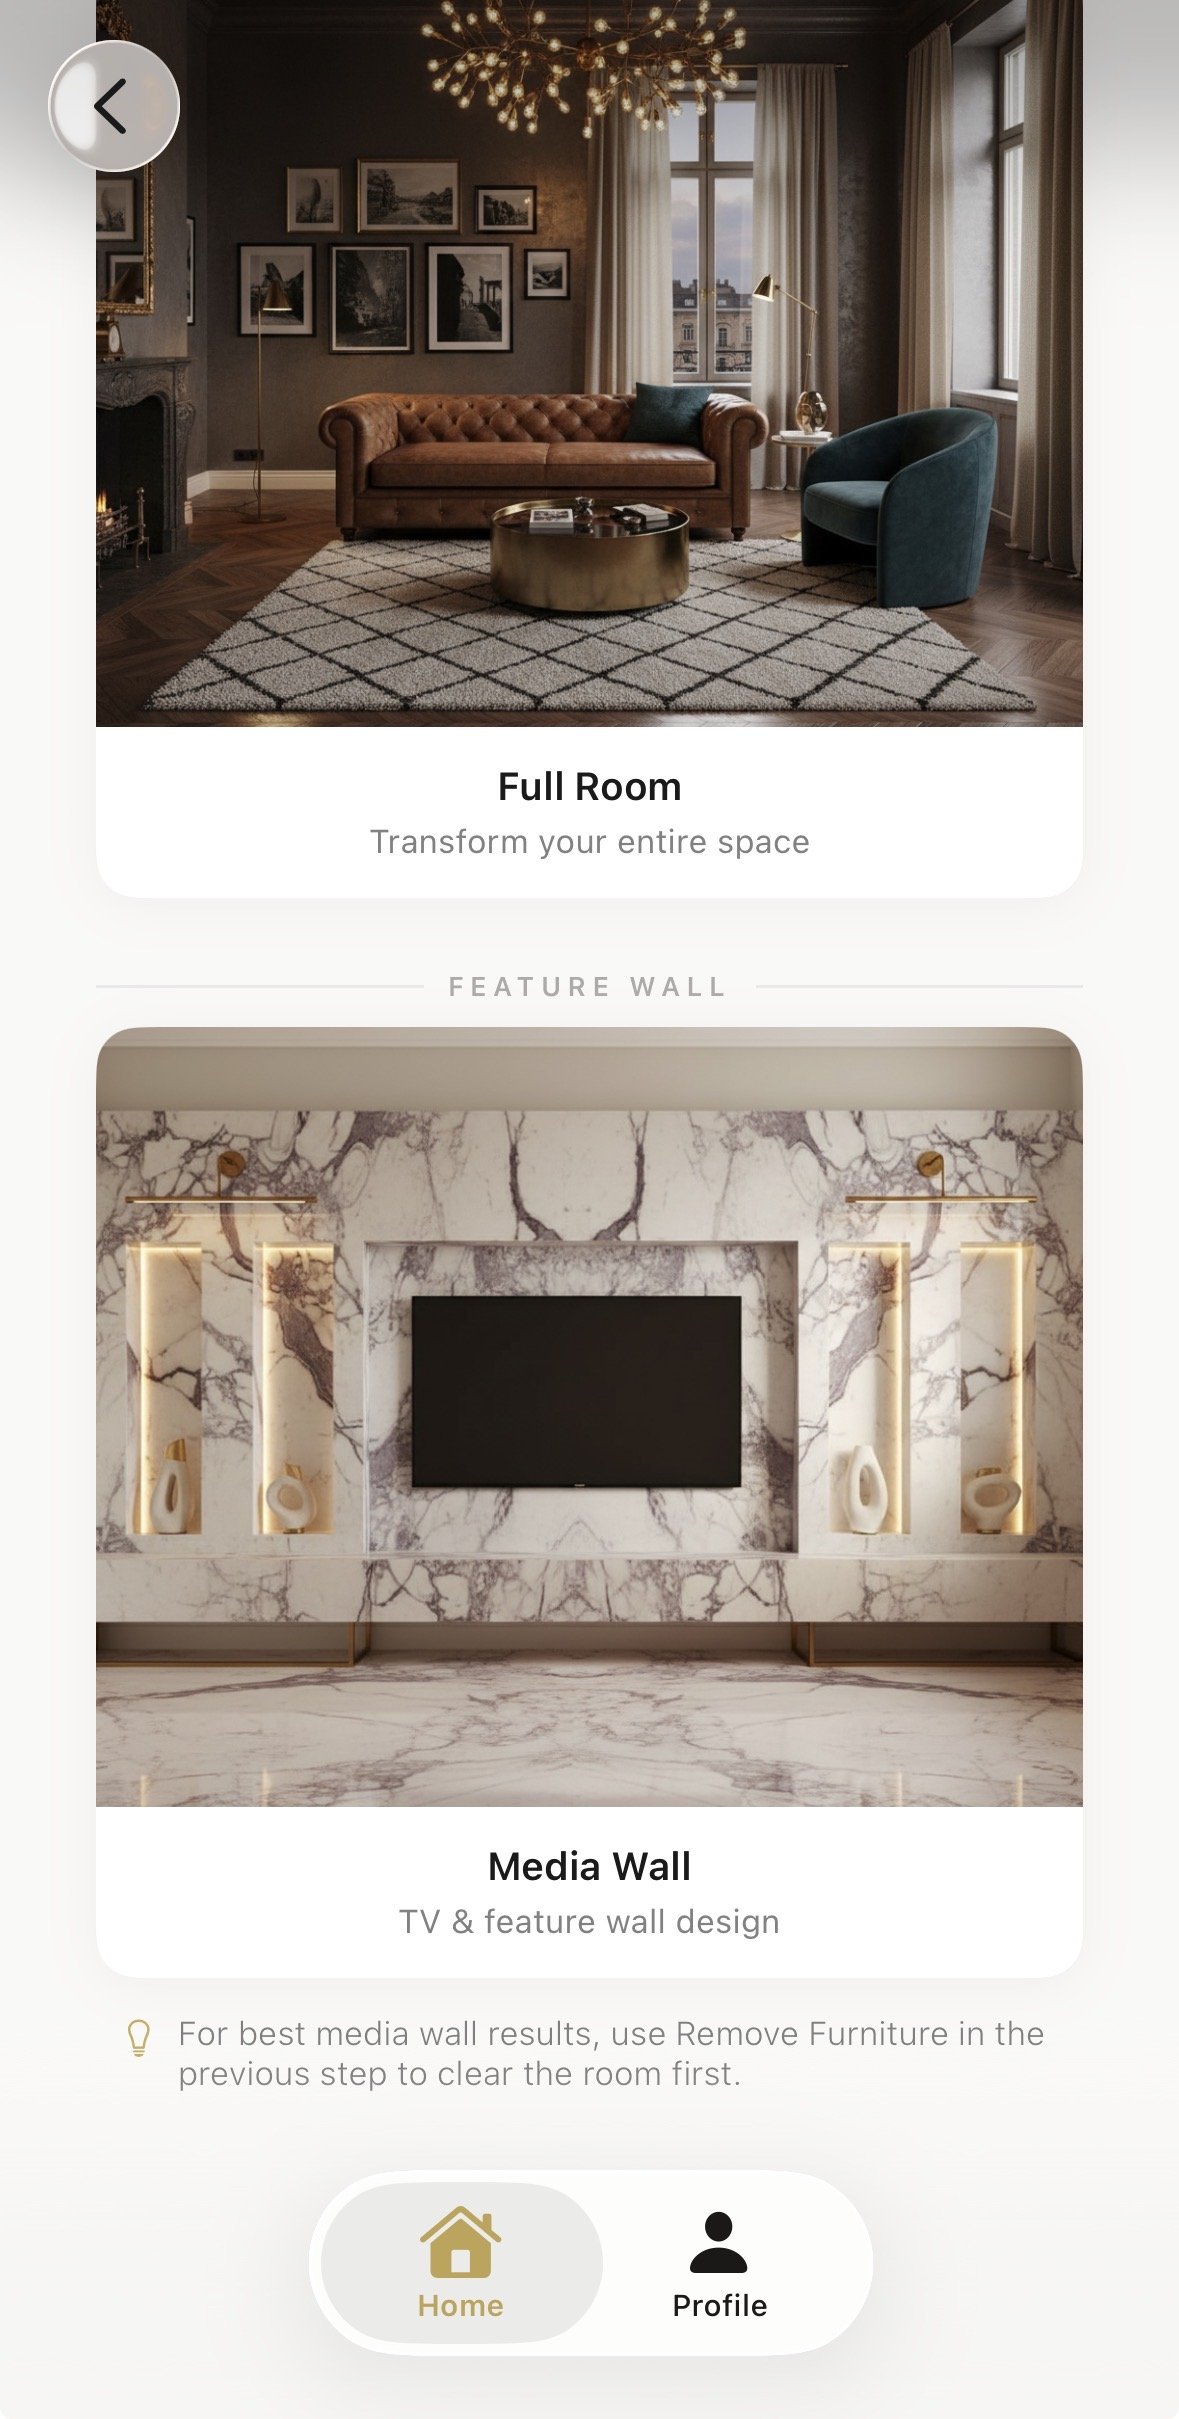
The app presents two design categories: "Full Room" and "Media Wall." The thumbnails give you a visual hint of what each produces. Full Room reimagines the entire space. Media Wall centres the design around a media wall feature.
Tap "Media Wall." This tells the AI to treat the media wall as the focal point — the element everything else in the room harmonises around.
Step 4: Choose "Design Full Room" for Complete Transformation
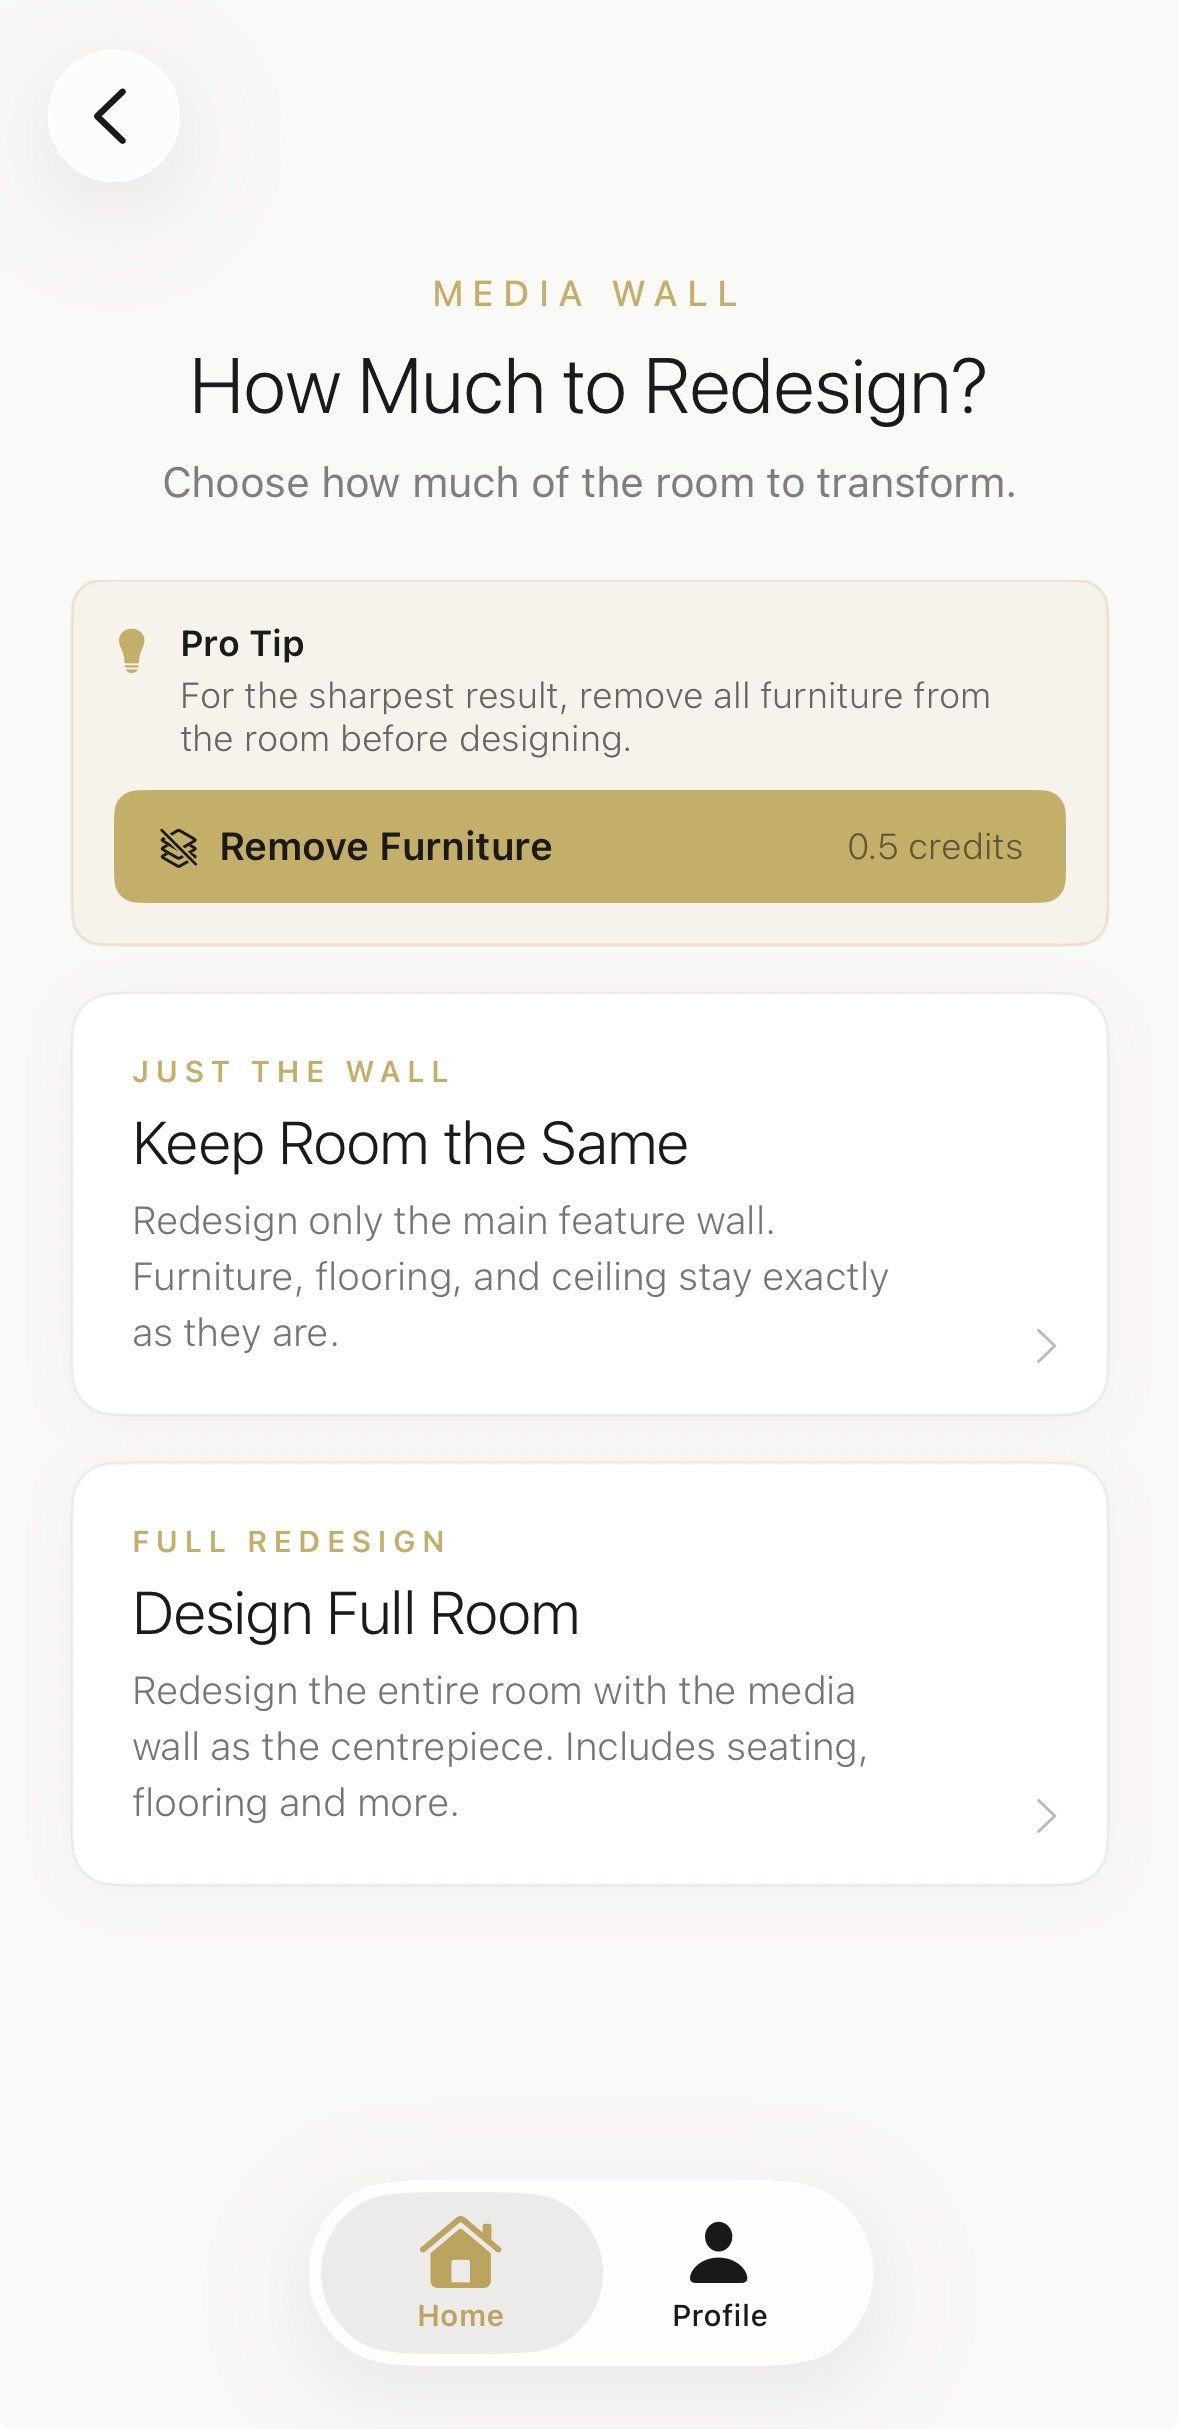
Next, the app asks how much of the room to redesign. You have two options:
- "Keep Room the Same" — the AI redesigns the media wall area only, preserving existing furniture, flooring, and layout.
- "Design Full Room" — the AI reimagines the entire room: flooring, walls, furniture, lighting, and the media wall.
There's also an option to "Remove Furniture" (0.5 credits extra) if you want the room empty before the AI designs it.
For this guide, we selected "Design Full Room" — a complete transformation.
Phase 2: Inspiration — Let the AI Read Your Mood Board
Step 5: Select "With Inspiration"
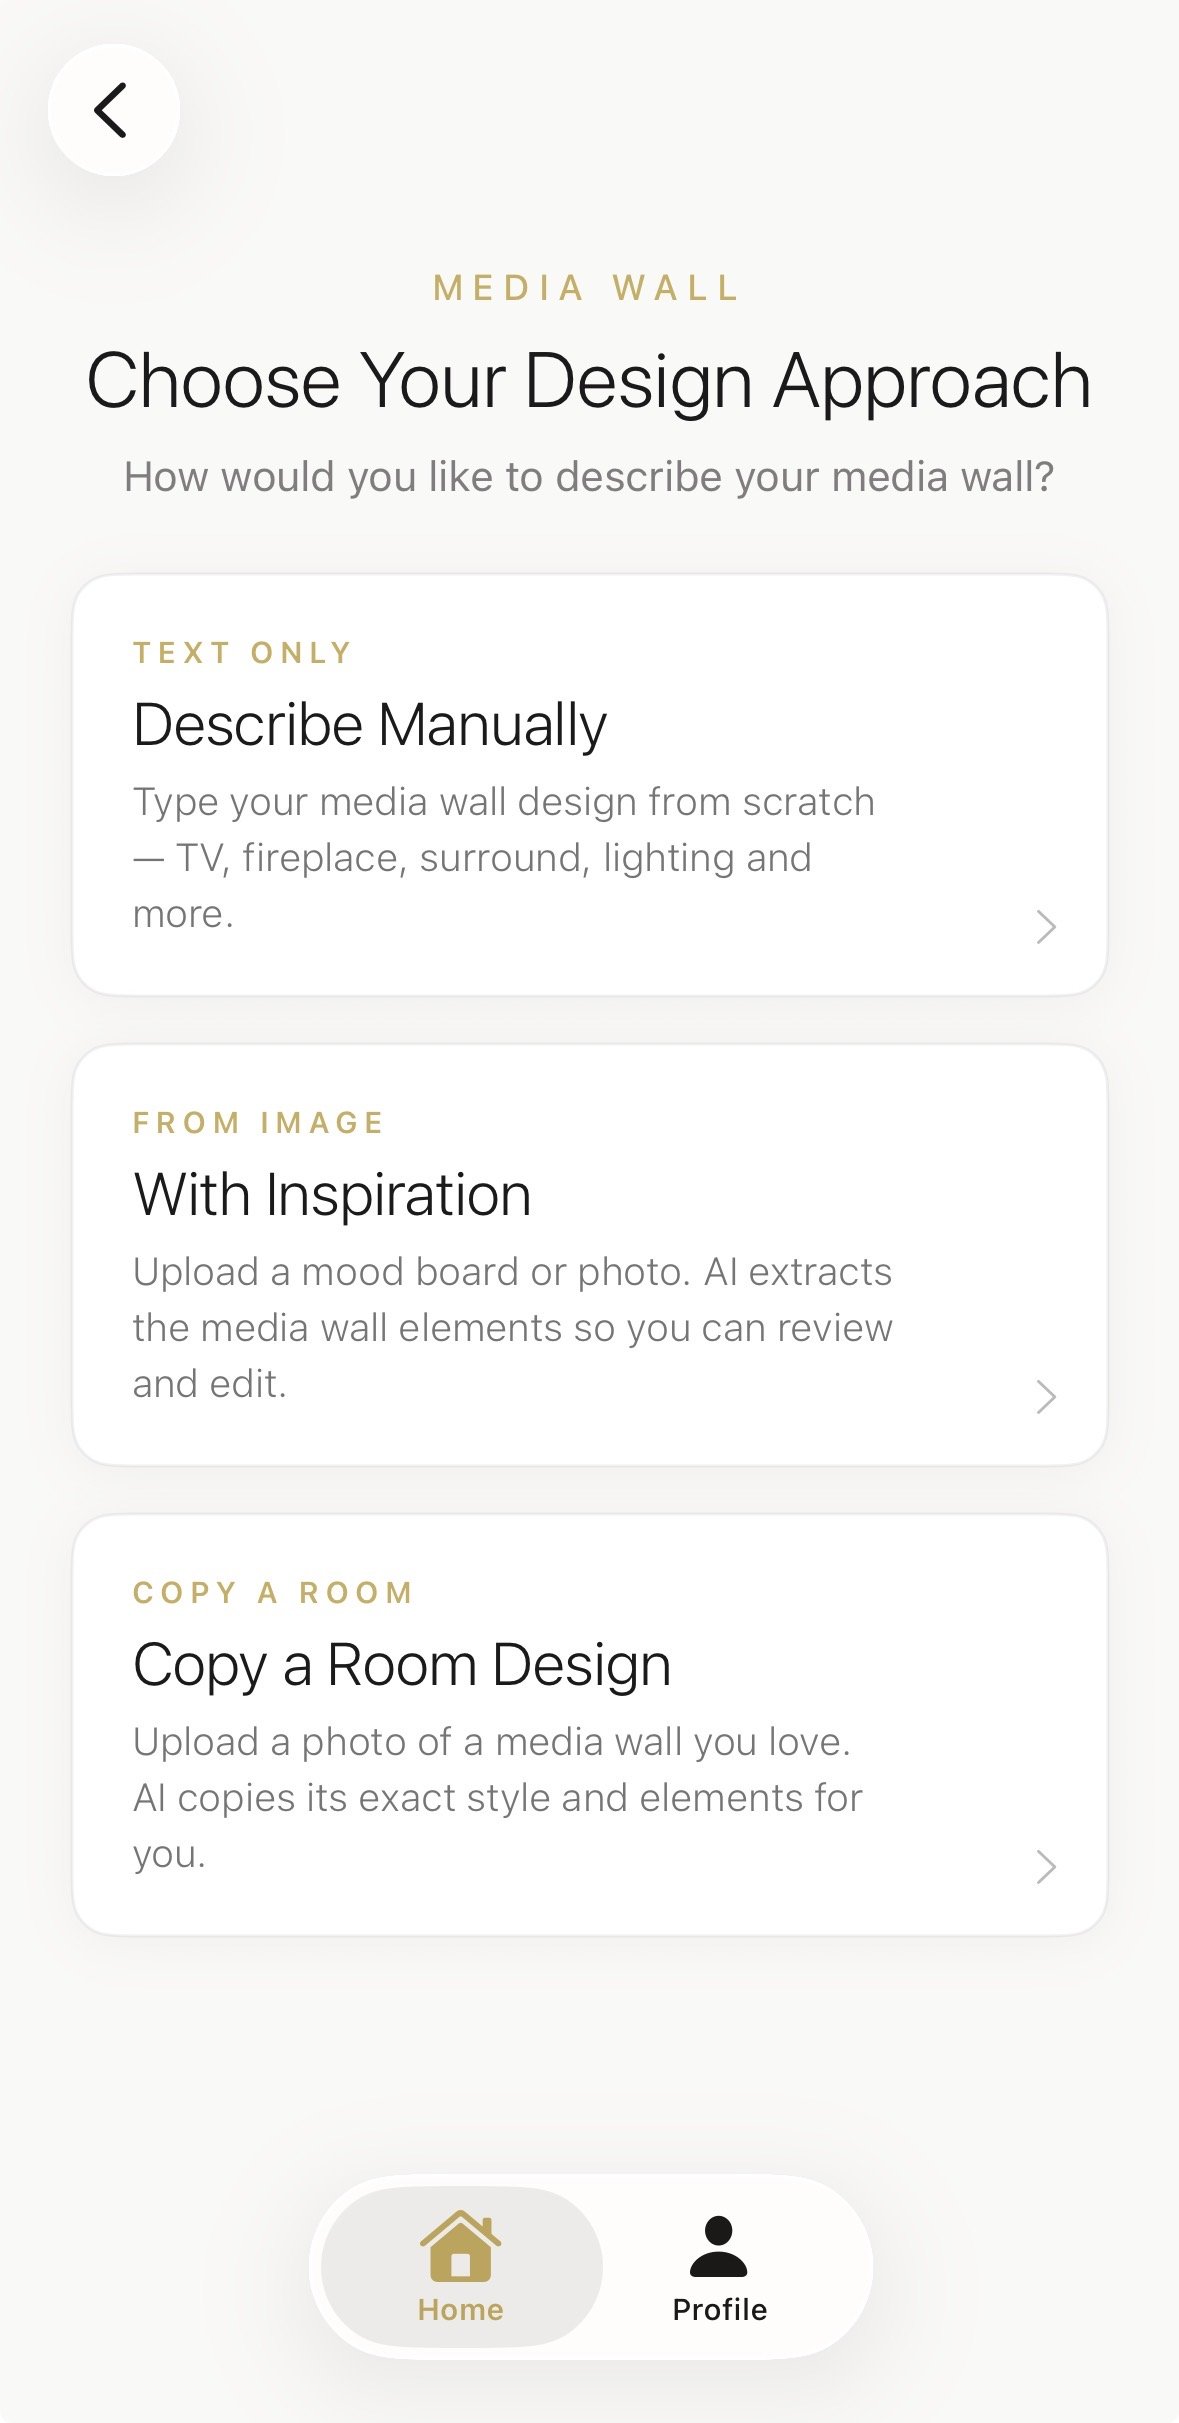
The app presents three ways to describe your media wall:
- "Describe Manually" — type your design from scratch (TV, fireplace, surround, lighting, materials).
- "With Inspiration" — upload a mood board or photo; the AI extracts design elements. ← We chose this.
- "Copy a Room Design" — upload a photo of a media wall you love; the AI copies its style.
Tap "With Inspiration." This is the method that separates Aspire Interiors from tools that make you describe everything in words. You show the AI what you want. It reads the image.
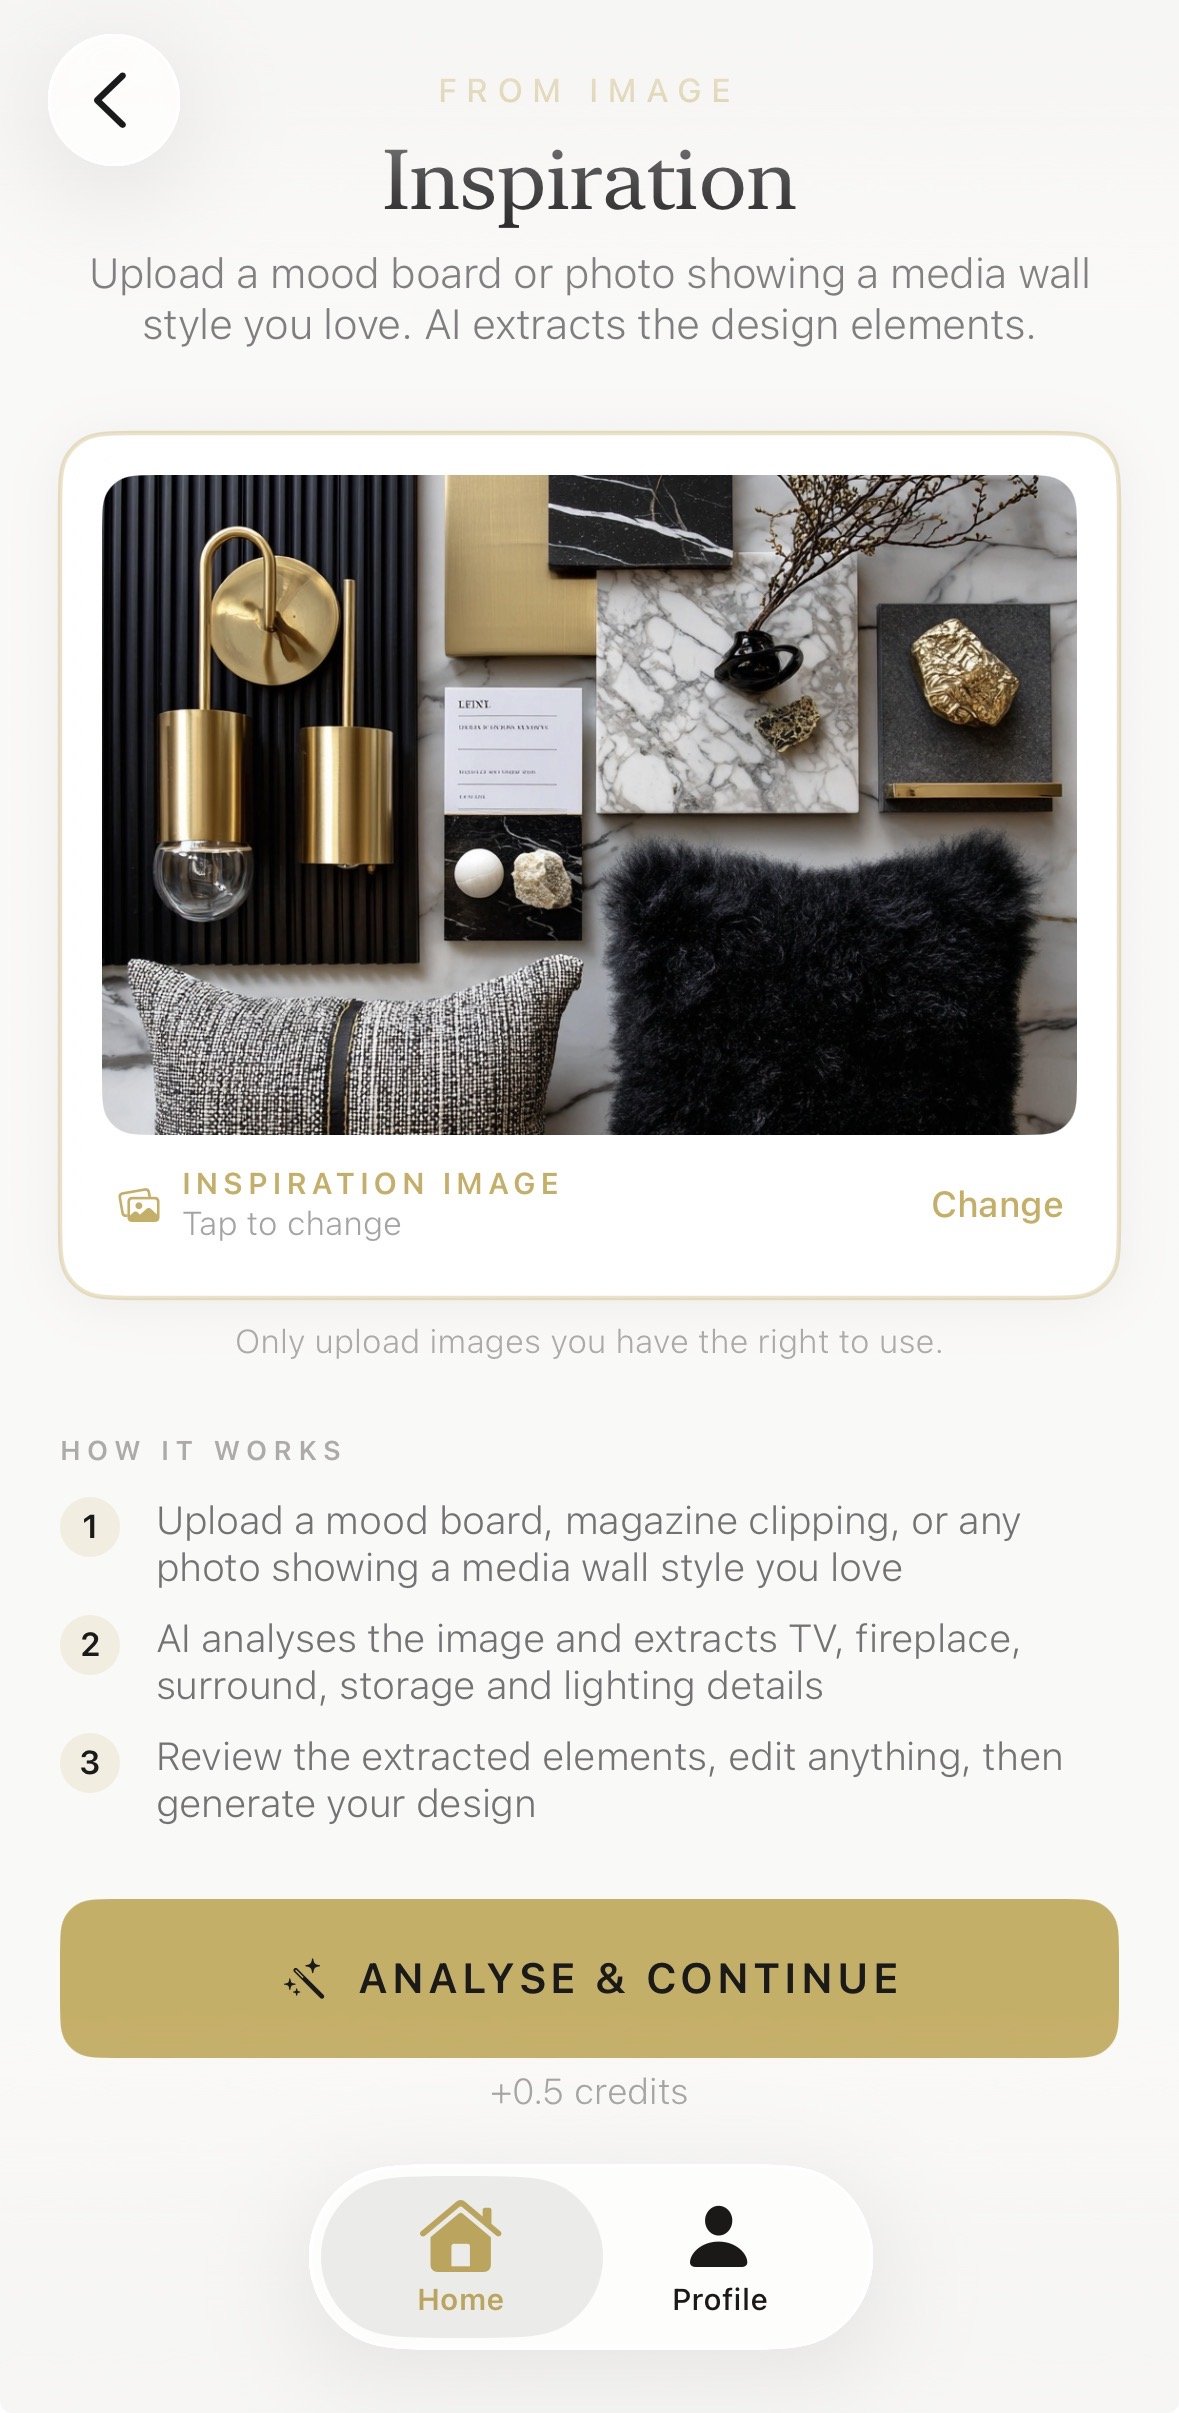
Step 6: Upload Your Mood Board
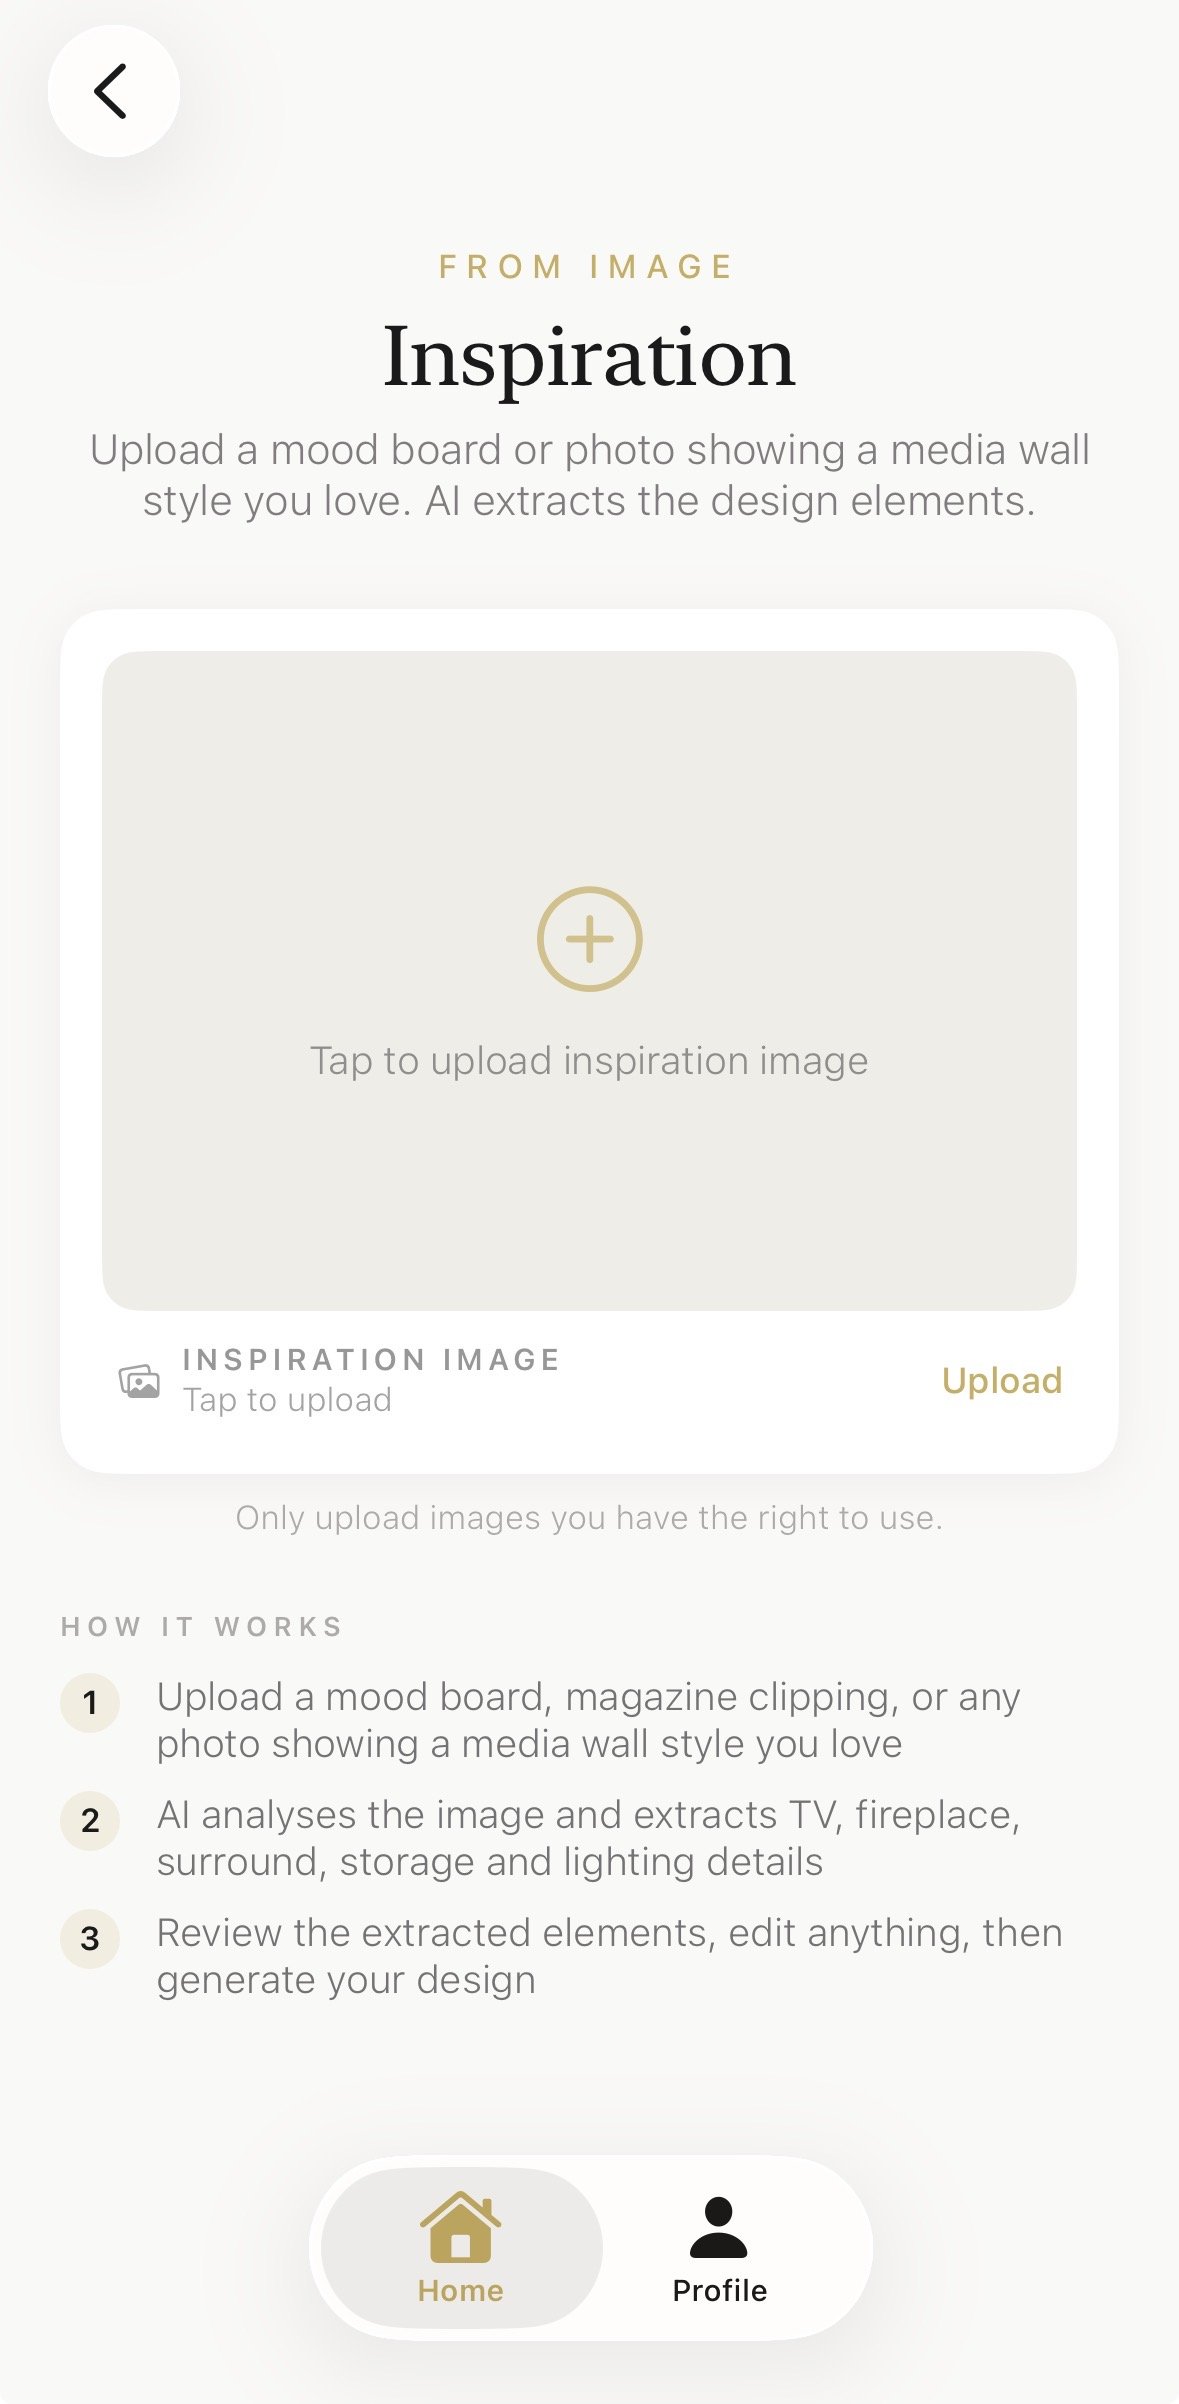
The inspiration upload screen shows a large rounded area with a plus icon and the text "Tap to upload inspiration image." Below it, a four-step explainer manages expectations: Upload → AI Analysis → Review/Edit → Generate.
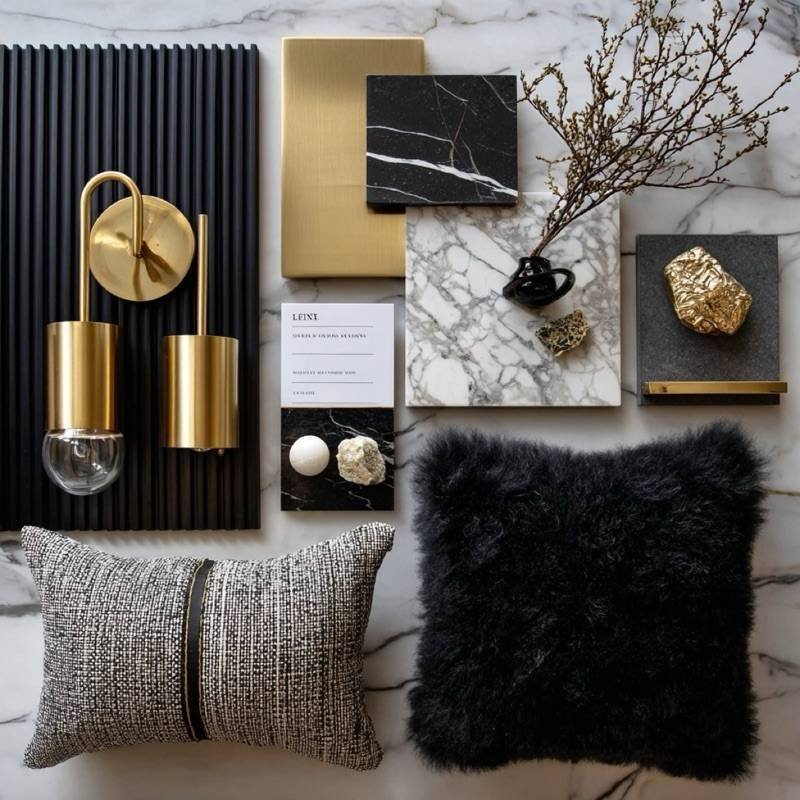
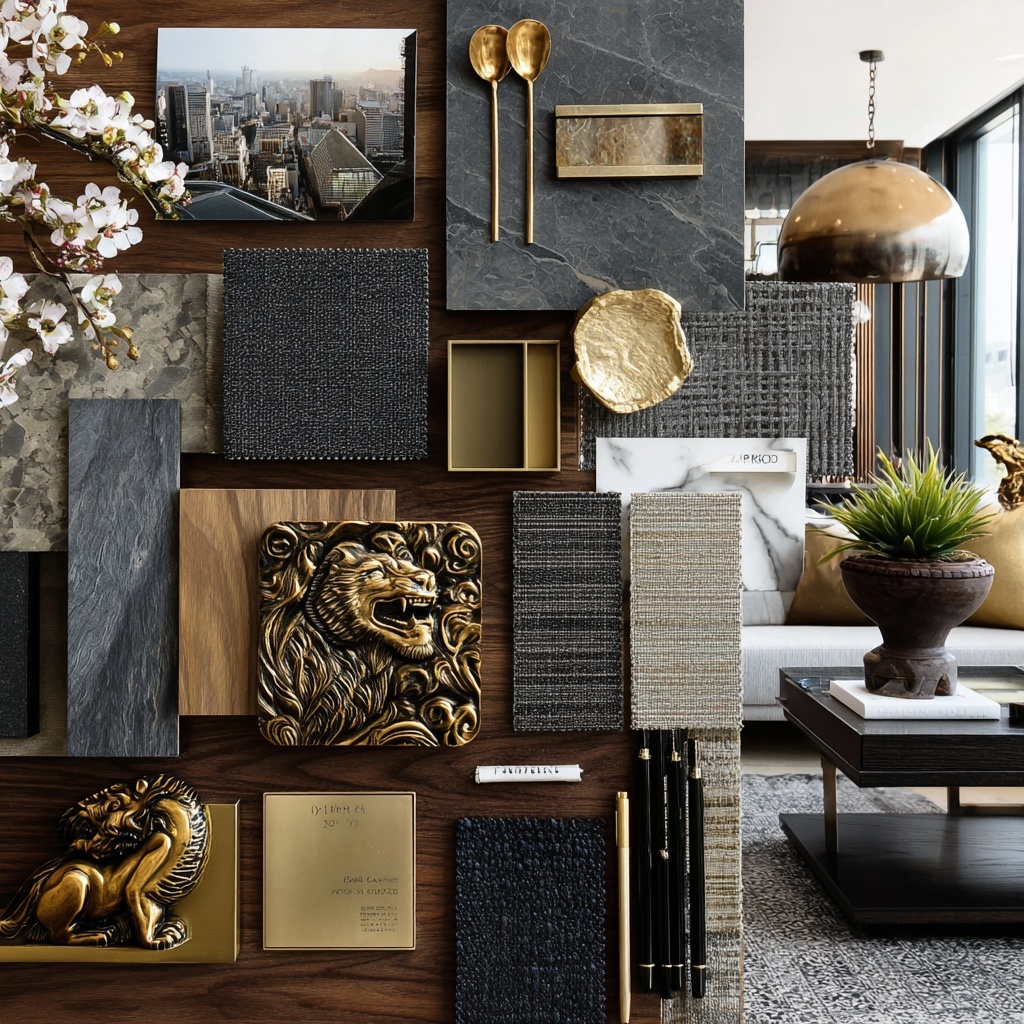
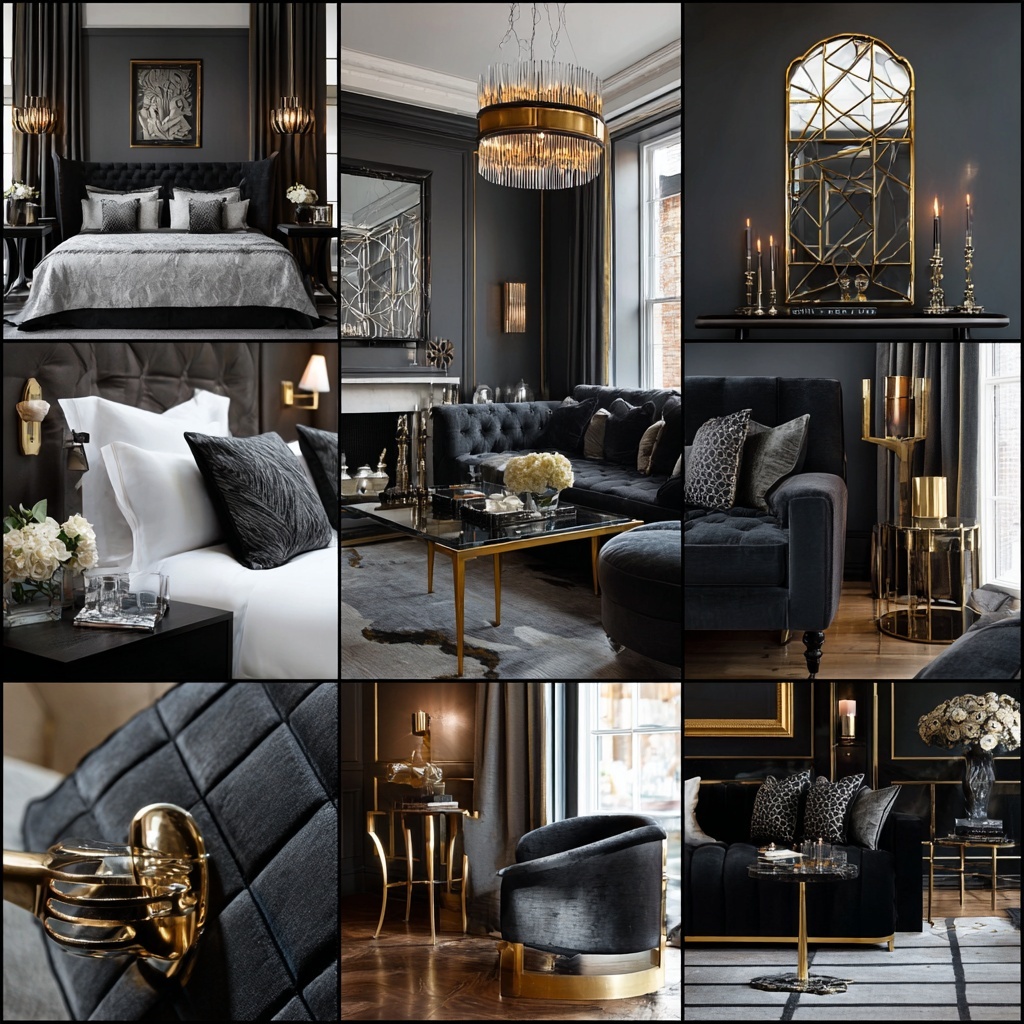
For this tutorial, we used a physical flatlay mood board: a marble surface with a brass pendant lamp, black fabric textures, and two cushions — one textured charcoal, one fuzzy black. The image is warm, editorial, and clearly luxury-focused.
Tap the upload area and select your mood board from your camera roll. The image appears in the preview area. Tap "Analyse & Continue."
Step 7: The AI Analyses Your Mood Board
The app processes the image and extracts design elements. This takes a few seconds. The result is a "Full Room Design" form with six pre-populated fields:
- TV / Screen: "Frameless display with brass accents"
- Surround / Frame: "Black fluted panels, brass, and marble"
- Storage / Shelving: "Black marble floating shelves, brass elements"
- Lighting: "Integrated brass wall sconces, soft ambient glow"
- Seating: "Textured charcoal linen sofa, fuzzy black cushions"
- Flooring: "Polished white marble with dark veining"
Every field maps directly to something visible in the mood board. The brass lamp became "brass accents" and "brass wall sconces." The black fabric became "black fluted panels" and "charcoal linen sofa." The marble surface became "marble" in the surround and "white marble" flooring. This isn't guesswork — the AI is reading the actual materials and colours in your image.
You can edit any field. If the AI misreads something, or if you want to adjust the description, tap the field and change the text. Every field is editable before you generate.
Scroll down to see all populated fields. The AI analyses the entire mood board and fills every relevant category.

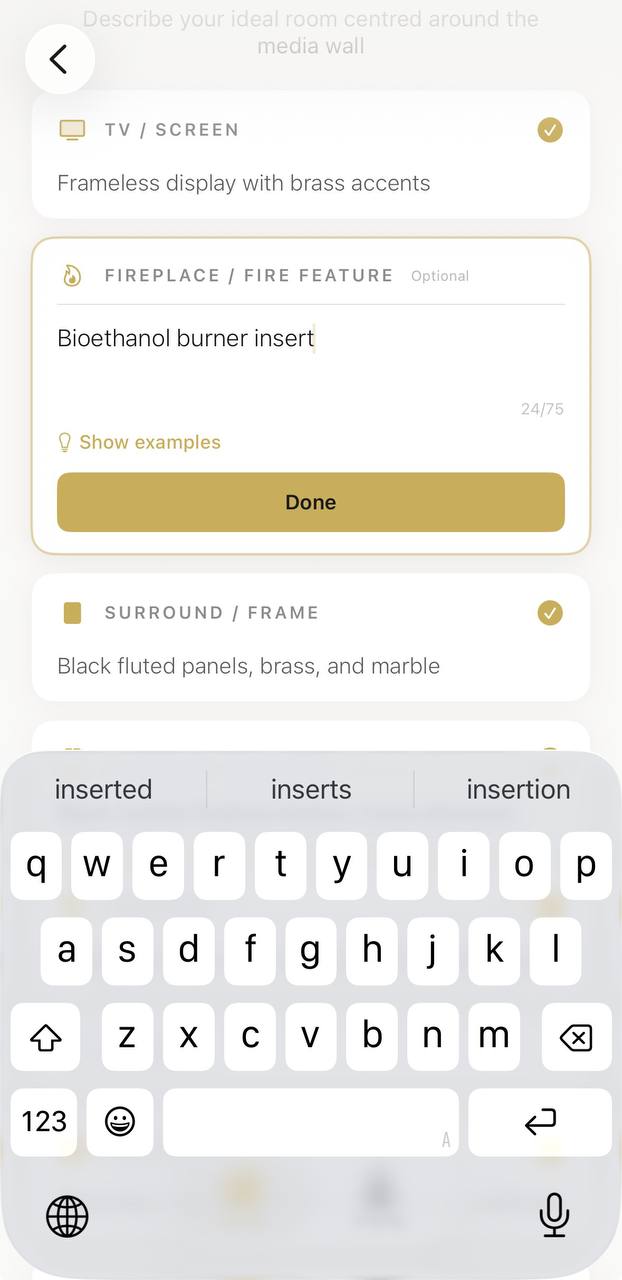
Step 8: Add Manual Details the AI Missed
The AI reads materials and colours brilliantly. But it can't know your specific requirements unless they're visible in the mood board.
For this design, we wanted a bioethanol burner insert in the media wall — a real flame feature without the need for a chimney or gas connection. The mood board didn't show a fireplace, so the AI didn't include one.
Scroll to the "Additional Instructions" field and type: "Bioethanol burner insert."
This is the hybrid workflow that makes the app powerful: the AI handles the aesthetic foundation, you add the specifics that matter to your life.
Phase 3: Generate — See Your Room Transformed
Step 9: Tap Generate
Review the populated fields. When you're happy, tap the gold "Generate" button.
The app shows a progress screen: "The Atelier is at Work" with a percentage counter. Generation typically takes 15–20 seconds. The AI is analysing your room photo, reading the architecture (window placement, ceiling height, wall proportions), and building a full room design that incorporates every element from your mood board — while preserving the structure of your actual space.
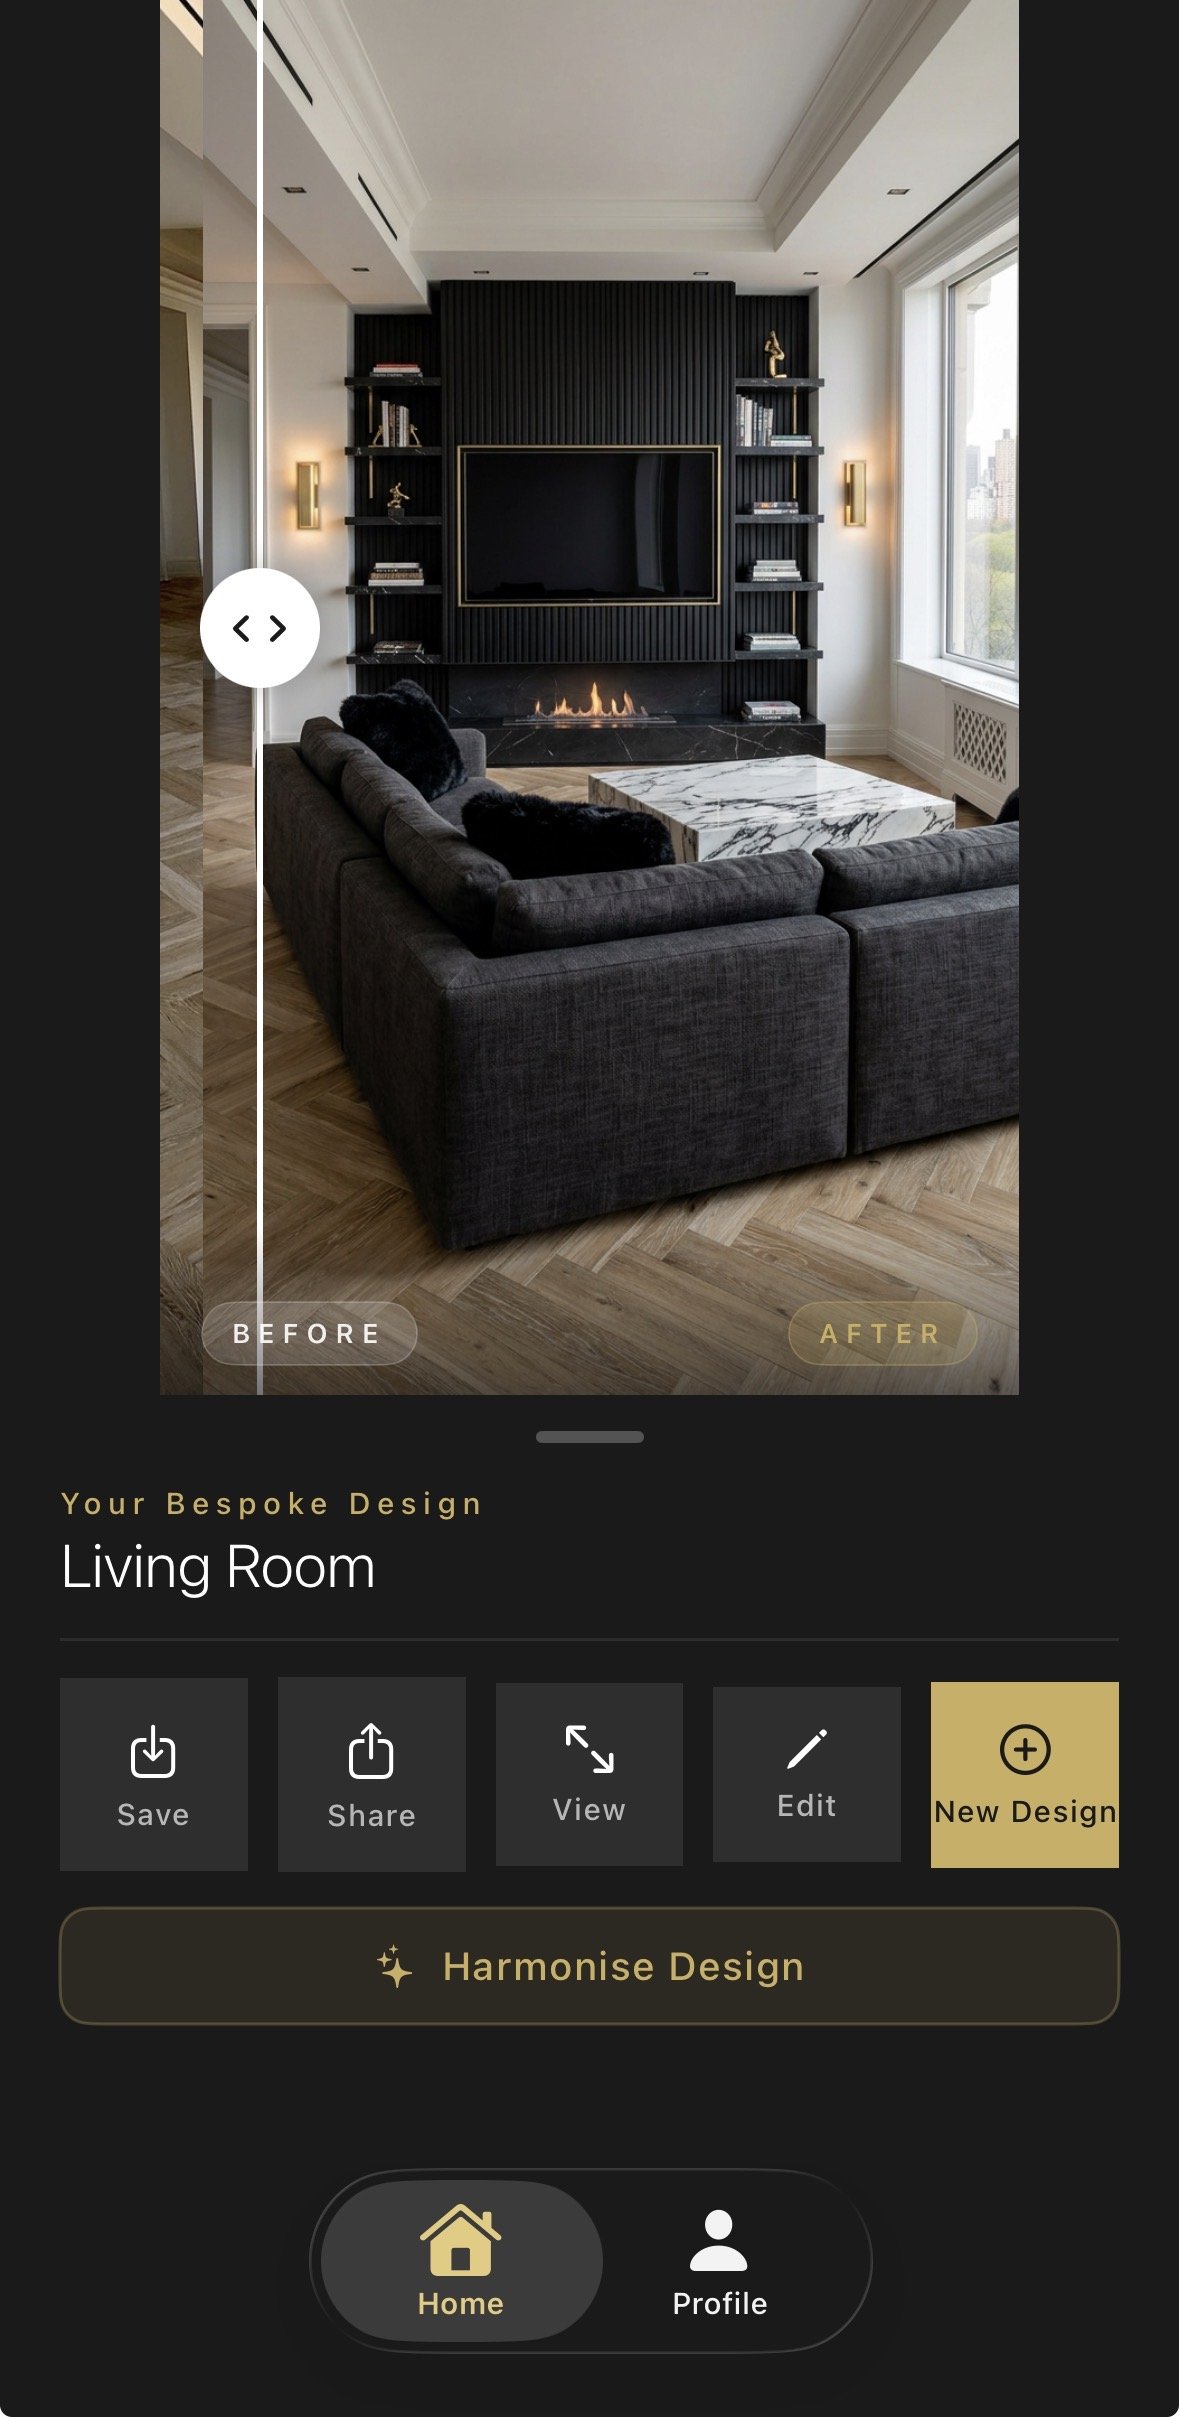
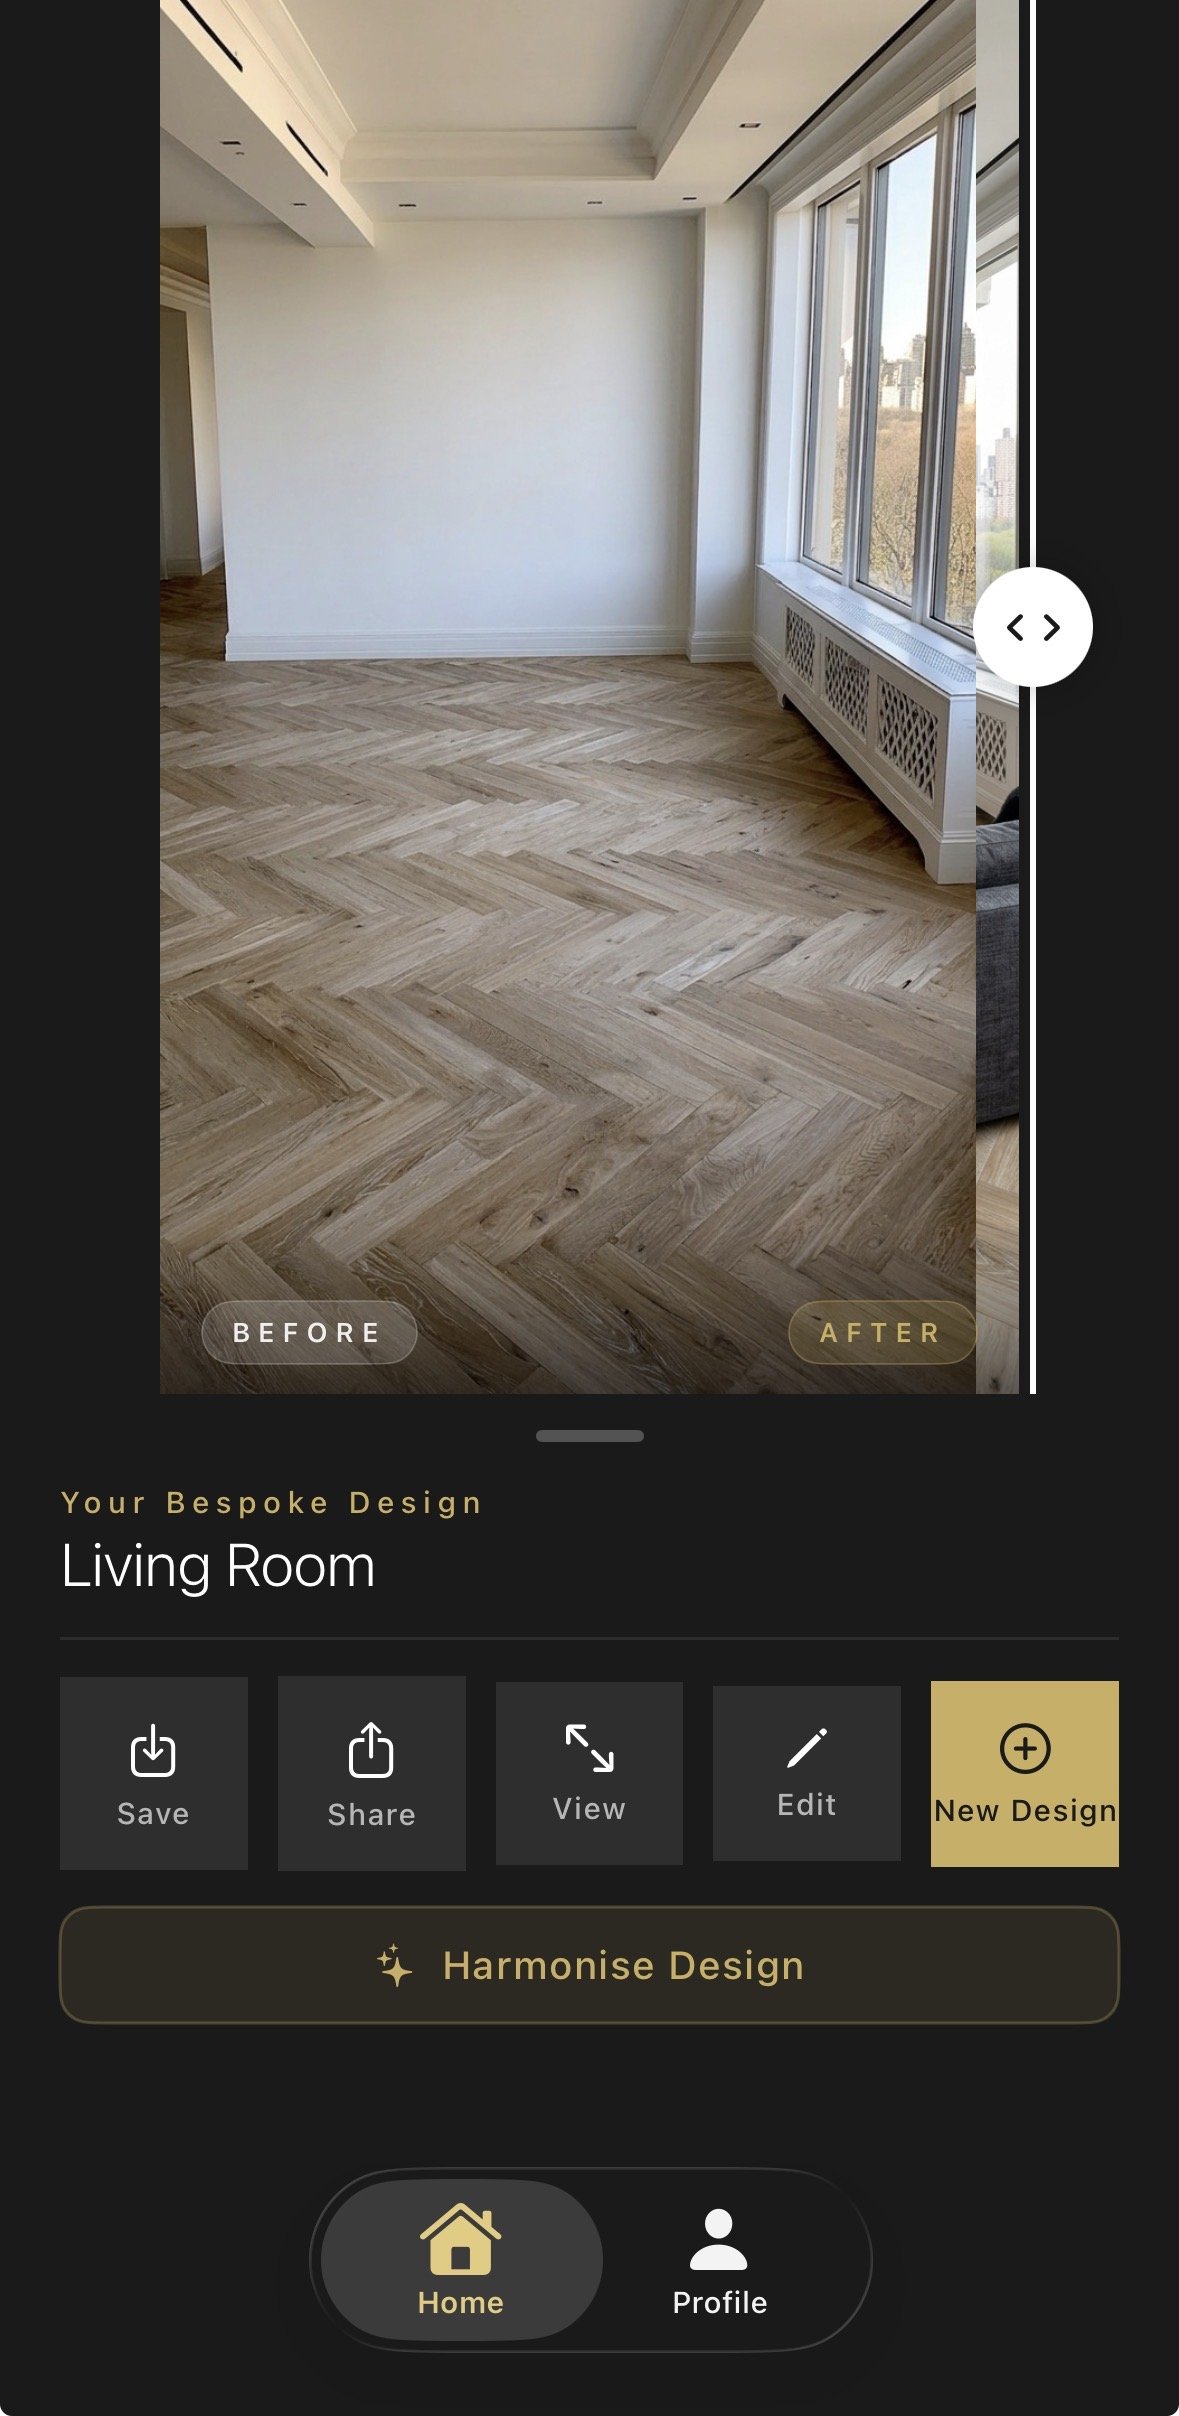
Step 10: Review the Before/After Slider
The result screen shows a vertical before/after slider. Drag it to reveal the transformation.
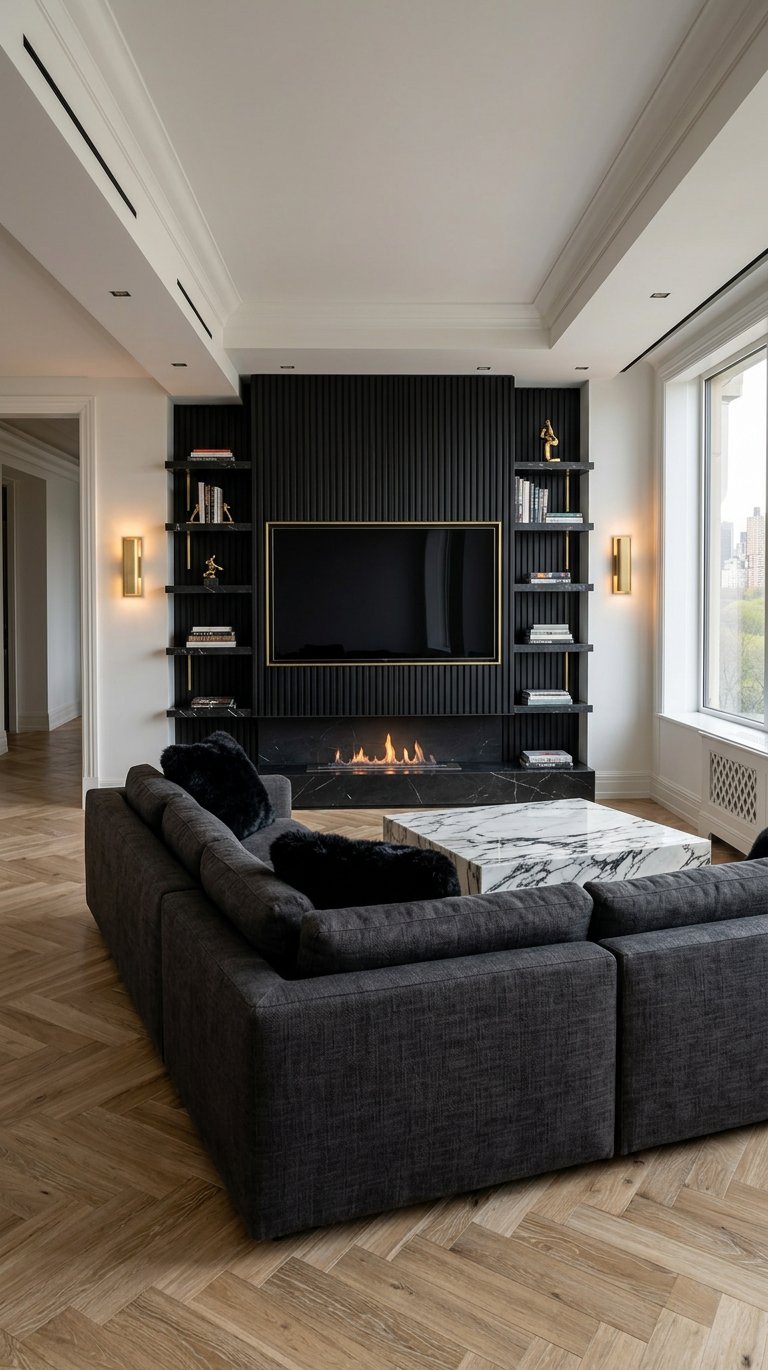
- Before: Your original room — empty white walls, herringbone light-wood flooring, large windows with a decorative radiator cover, crown moulding, high ceiling.
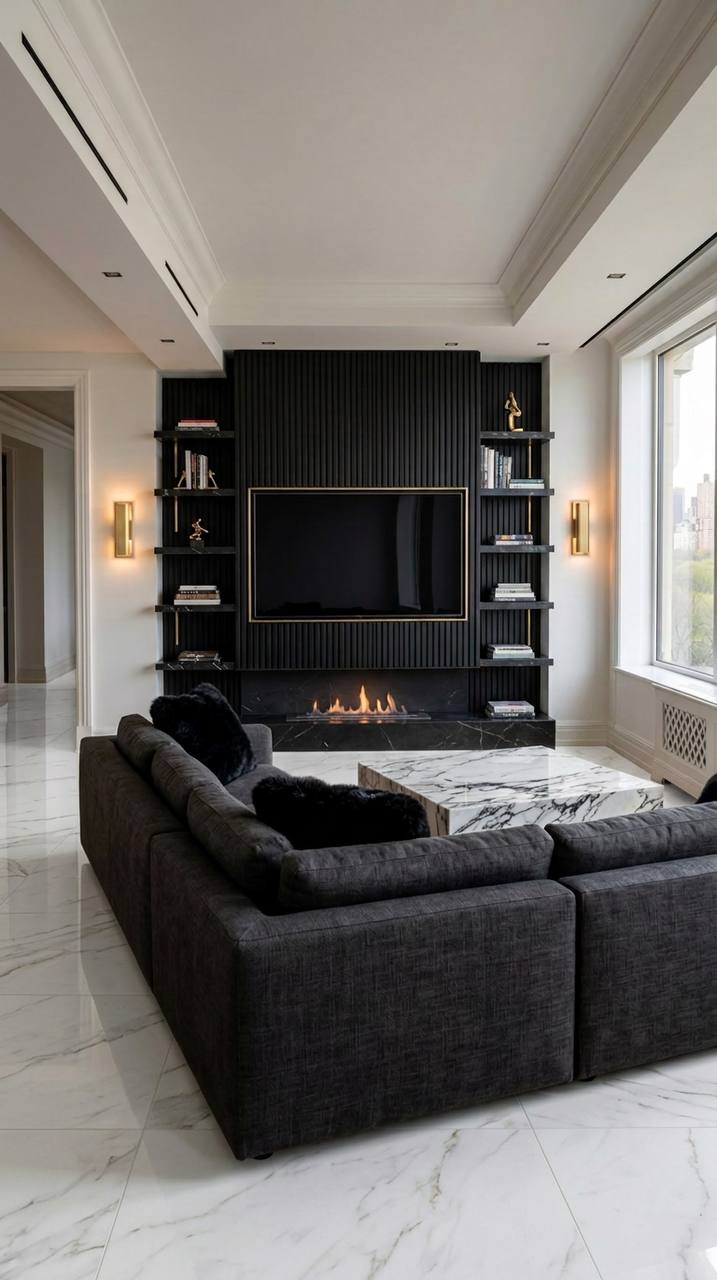
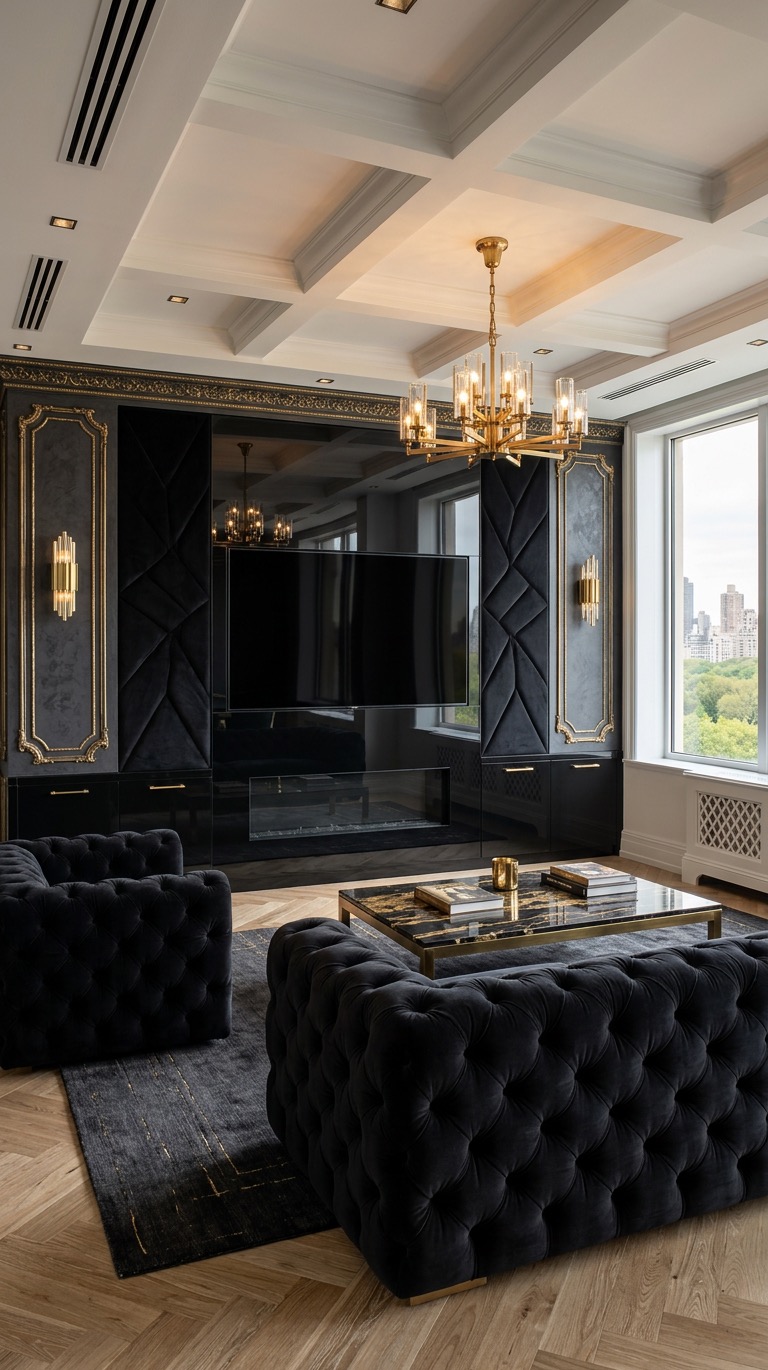
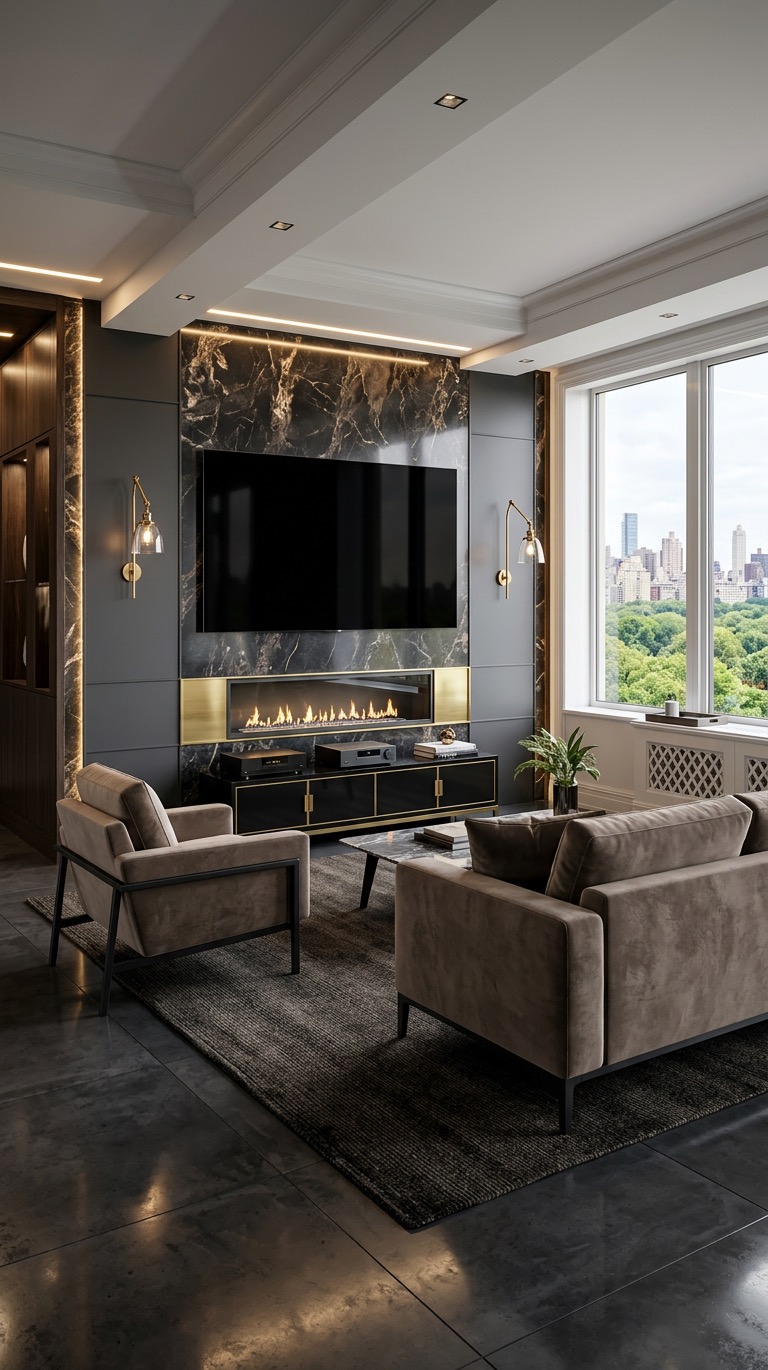
- After: A luxury living room with a black fluted media wall spanning the full width of the wall, brass trim, a frameless TV mounted on the media wall, built-in black shelving on either side, a bioethanol burner fireplace on a black marble hearth at the base, a dark grey sectional sofa with black cushions facing the media wall, a white marble coffee table, brass wall sconces on either side, and the original herringbone flooring preserved.
The slider is the moment of truth. Drag it slowly. The AI has preserved your windows, ceiling height, crown moulding, and room proportions. It hasn't just slapped a TV on a wall — it has designed an integrated architectural feature that respects your space.
Step 11: View the Clean Result
Below the slider, tap "View" to see the final design without any UI overlay. This is the image you save, share, or show your builder.
The clean render shows the full room in high resolution:
- Media wall: black fluted panels with brass trim, frameless TV, built-in shelving
- Fireplace: bioethanol burner on black marble hearth
- Seating: dark grey sectional, black cushions
- Table: white marble coffee table with grey veining
- Lighting: brass wall sconces, warm ambient glow
- Flooring: original herringbone wood (preserved)
- Architecture: large windows, crown moulding, high ceiling (all preserved)
This is the image that becomes your design brief. Every material is specified. Every proportion is accurate to your room.
Phase 4: Refine — Edit Without Starting Over
Step 12: Edit the Flooring
The first result is strong. But let's say you want to see how the room looks with white marble flooring instead of the original herringbone wood.
Tap "Edit" on the result screen. The app presents a text field with the prompt: "What would you like to change?"
Type: "White marble floor."
Tap "Apply." The AI regenerates the image, changing only the flooring material while keeping everything else identical — media wall, sofa, fireplace, lighting, furniture placement, room proportions. This takes 10–15 seconds.
The result: the same room, same layout, same media wall, but with large-format white marble tiles with grey veining instead of herringbone wood.
Step 13: Edit the Media Wall Colour
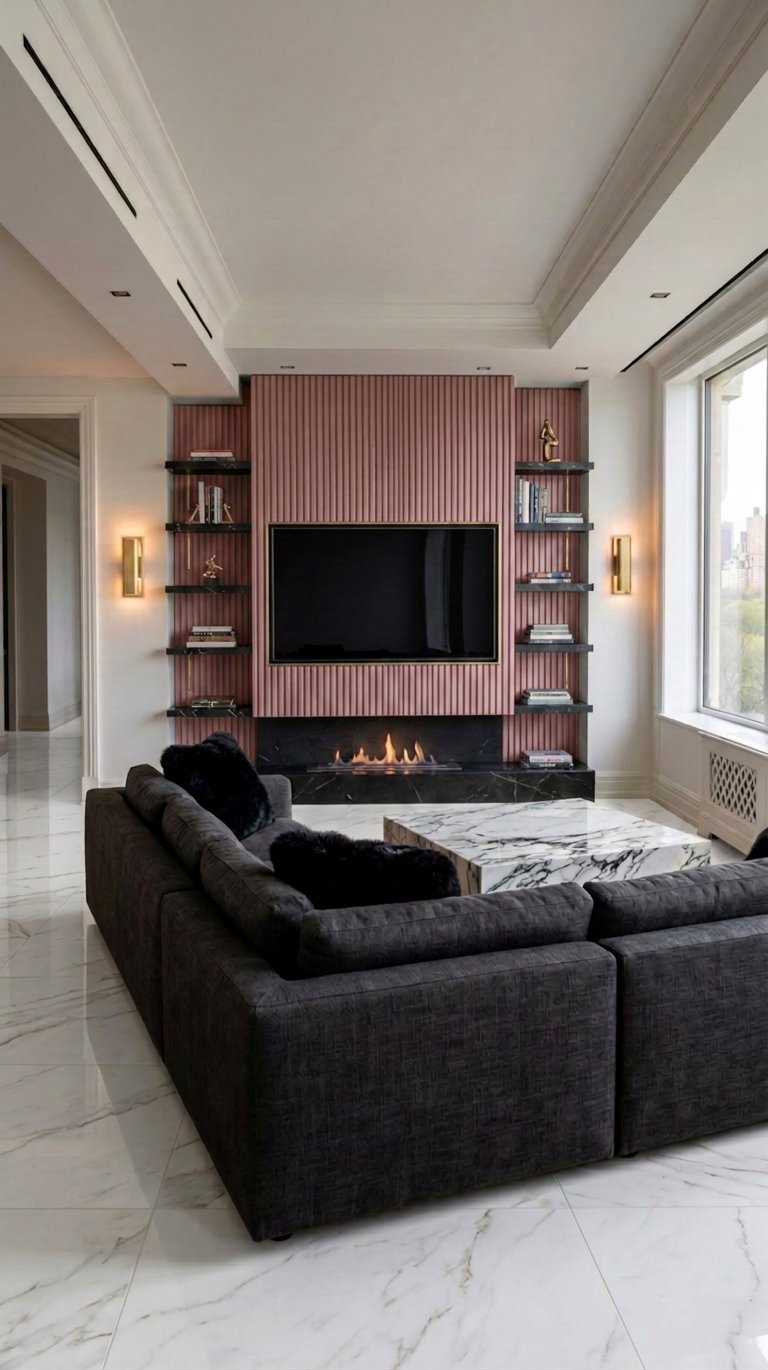
Now let's push it further. Change the media wall panels from black to pink.
Tap "Edit" again. Type: "Change the black fluted media wall panels to pink."
Tap "Apply." The AI changes only the panel colour — from black fluted to soft pink fluted — while preserving the brass trim, TV placement, shelving, fireplace, sofa, coffee table, lighting, and the newly added white marble flooring.
The result: a cohesive pink-and-brass media wall with white marble flooring, dark grey sofa, and brass sconces. Two edits transformed the mood board's original black-and-gold aesthetic into a pink-and-gold variation — and the room still feels designed, not random.
This is the power of iterative refinement. You're not locked into the first result. You're exploring possibilities.
Why This Process Works
Most AI design tools give you a single image and send you on your way. Aspire Interiors is built around a different idea: design is iterative, not instant.
The 5-element architectural foundation — window frames, flooring, wall colour, hardware, and ceilings — ensures the AI doesn't just replace your sofa. It redesigns the room as an interconnected system. The media wall isn't an isolated feature; it's the anchor that determines the seating arrangement, the lighting placement, the material palette, and the proportions of every other element.
The mood board method works because you don't need design vocabulary. You don't need to know what "fluted panels" or "bioethanol burner" means. You show the AI a photo of materials you love, and it translates that visual language into design specifications. The AI reads the brass lamp and knows to add brass trim. It reads the black fabric and knows to suggest black fluted panels. It reads the marble surface and knows to propose marble shelving.
The edit feature works because you're not starting over. Each edit is surgical — change the flooring, change the wall colour, add a fireplace — while the AI preserves the design's coherence. This is what separates a design tool from a filter app.
What the AI Is Doing (And What It Isn't)
The Aspire Interiors app uses a multi-stage AI pipeline:
- Image analysis — the AI reads your room photo and maps architectural features: walls, windows, doors, ceiling height, floor area, existing furniture (if any).
- Mood board extraction — a separate AI model analyses your inspiration image and extracts colour palettes, material textures, and design language. It maps these to the 6 design fields (TV, surround, storage, lighting, seating, flooring).
- Design generation — a diffusion model generates a photorealistic room render, constrained by the architectural map and the material specifications. The result preserves your room's proportions while applying the new design.
- Edit refinement — when you request an edit, the model isolates the specified element (flooring, wall colour, furniture) and regenerates only that region, using the existing design as context to maintain coherence.
What the AI cannot do:
- Tell you whether your wall is load-bearing (consult a structural engineer)
- Specify electrical requirements for the TV or lighting (your electrician handles this)
- Guarantee that every piece of furniture shown exists in those exact dimensions (always measure and check product specs)
- Source materials or provide pricing (the design is visual inspiration; procurement is a separate step)
- Know your personal context — children, pets, a piano that must stay (you bring the context; the AI brings the visualisation)
Think of the AI as the sketch phase. It explores possibilities in minutes. The execution still requires human expertise, precise measurements, and quality materials.
Mood Board to Media Wall: 6 AI-Generated Design Examples
One of the most powerful features of the Aspire Interiors app is its ability to read a mood board — any image with colours, textures, and materials — and transform it into a complete media wall design. Below are six real examples of mood boards and the AI-generated designs that came from them.
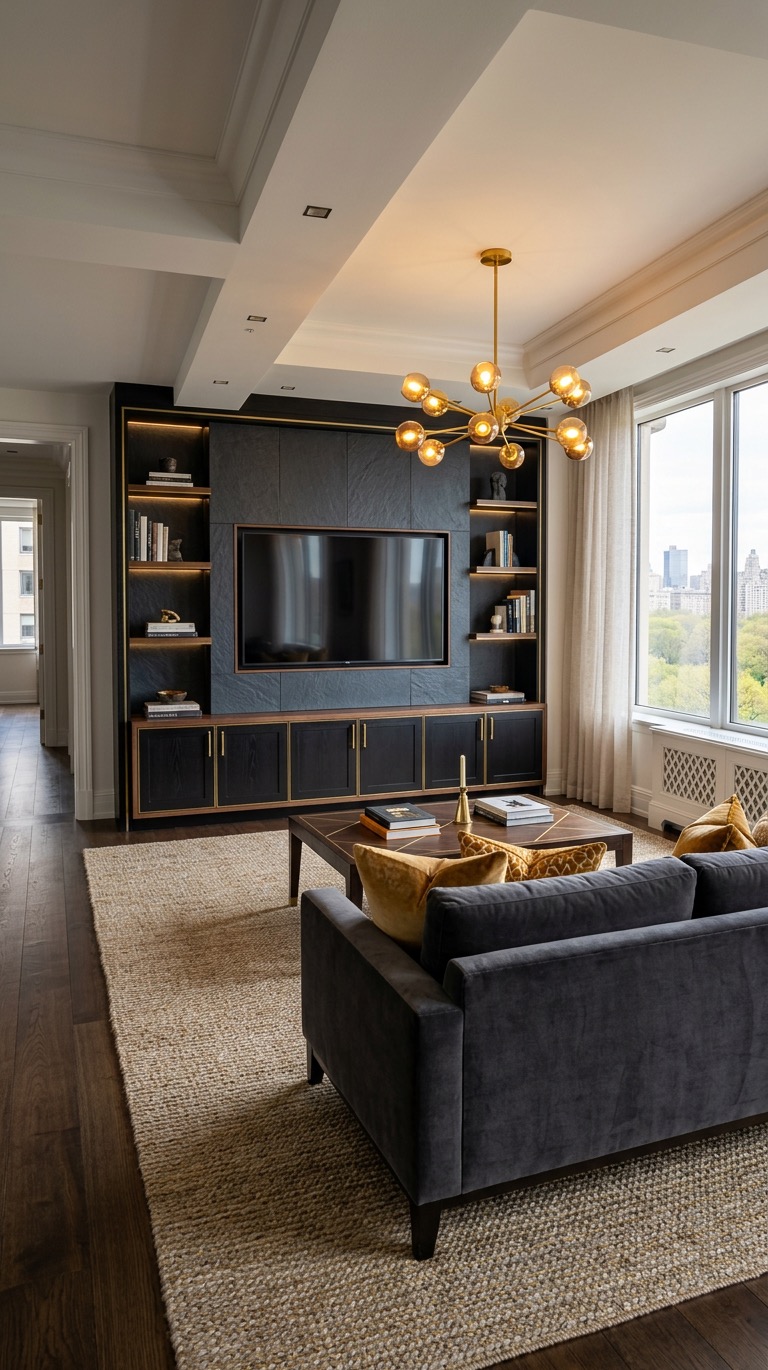
The Mood Board: Dark marble surfaces, gold decorative vessels, black textured materials, and dramatic moody lighting. A luxurious, dark palette with metallic gold accents against deep charcoal and black backgrounds.
What the AI Read: Dark wall panels, gold hardware and trim, black marble accents, dark upholstery, gold pendant lighting, dramatic contrast, metallic accents, dark wood flooring.
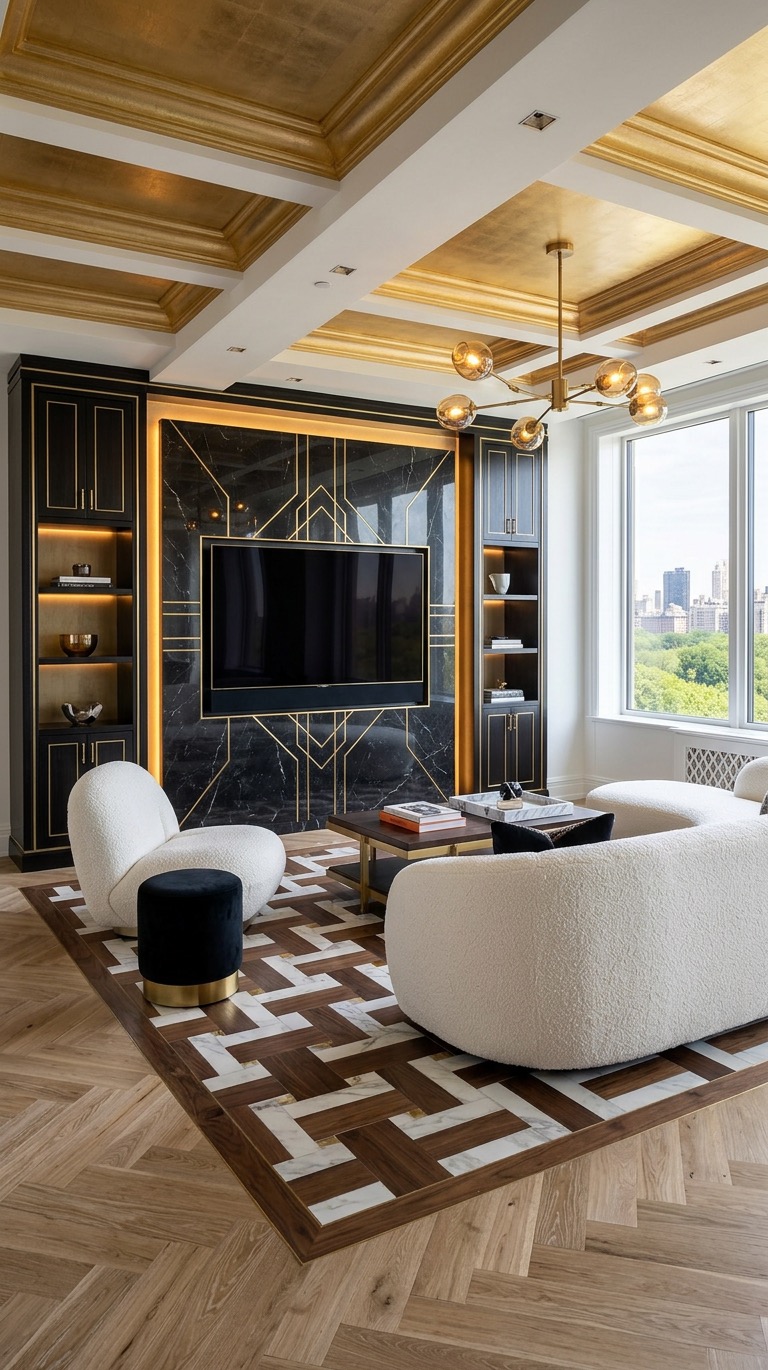
The Result: A moody, luxurious living room with a dark grey media wall featuring gold-accented fluted paneling. A dark velvet or leather sofa sits opposite, with a gold coffee table and gold pendant lighting overhead. The herringbone wood floor grounds the space in warmth, while the gold elements throughout echo the metallic accents from the mood board.
Materials: Dark grey plaster/panels, gold leaf/brass, dark velvet or leather, black marble, dark wood herringbone flooring, metallic pendant lighting
Style: Moody Luxury, Dark Glamour
Best for: North-facing rooms, spaces used primarily in the evening, anyone wanting a dramatic, masculine energy
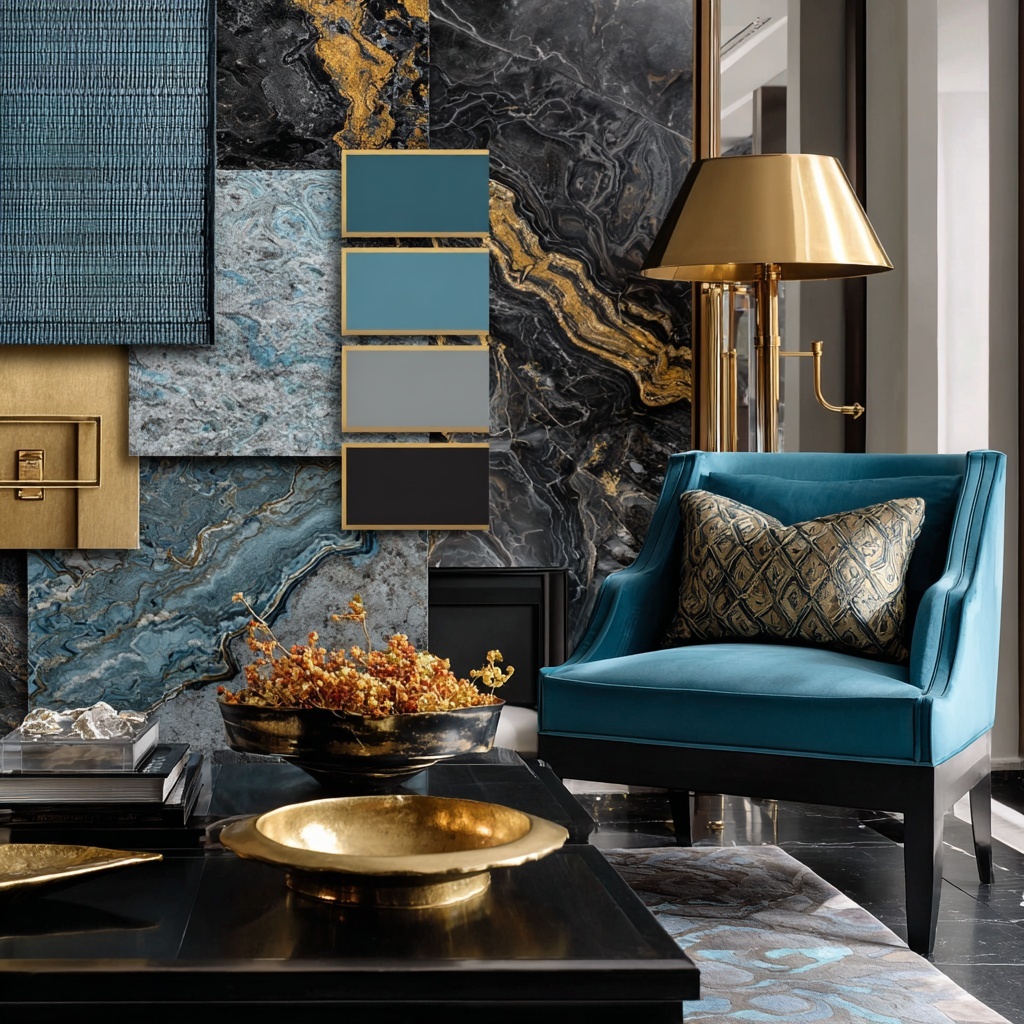
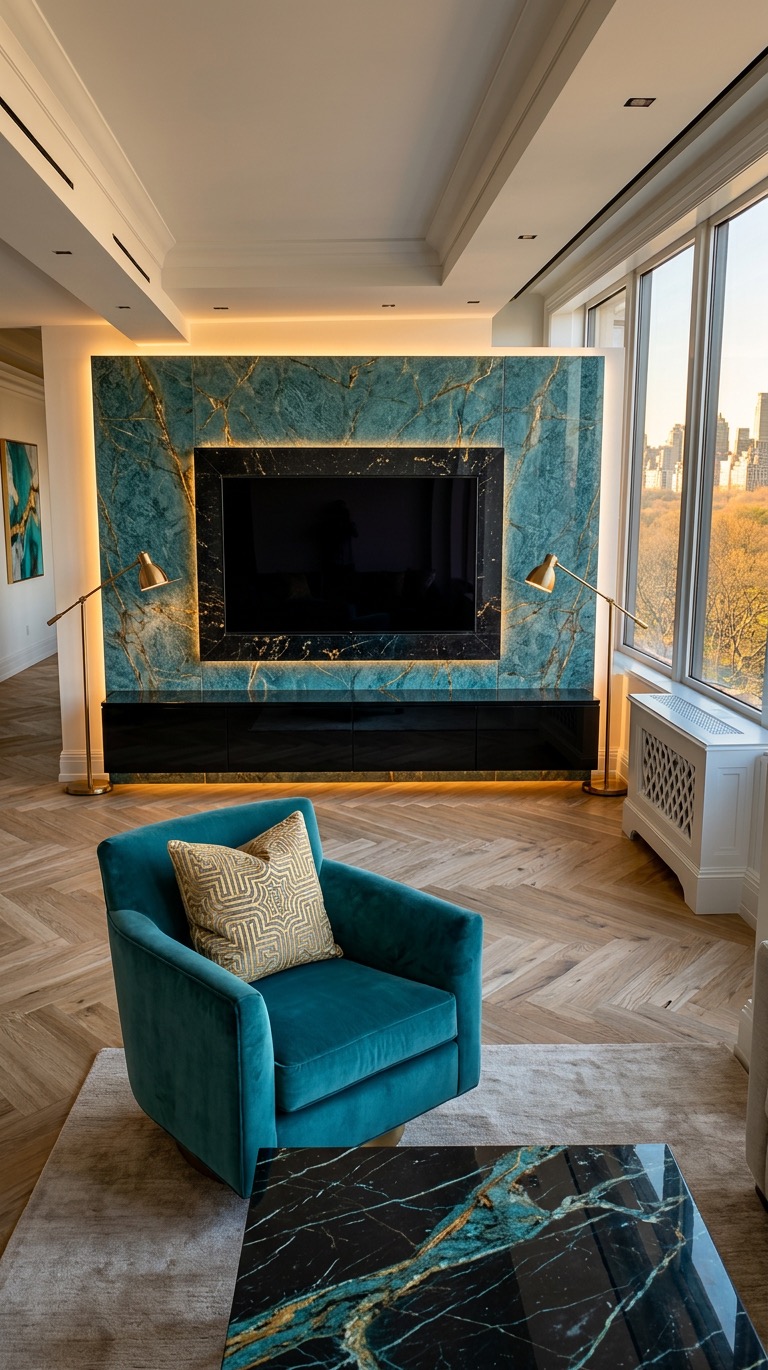
The Mood Board: Rich blue walls, gold decorative accents, a teal or turquoise velvet sofa, marble surfaces, and gold pendant lighting. A jewel-toned palette with deep blue as the dominant colour and gold as the accent.
What the AI Read: Blue wall panels, gold/brass hardware, blue velvet upholstery, marble surfaces, gold lighting, rich jewel tones, herringbone wood flooring, luxurious contrast.
The Result: A rich blue living room with blue walls and a blue velvet sofa that commands attention. A marble coffee table with a gold base sits in the centre, while gold pendant lighting and brass accents throughout echo the metallic elements from the mood board. The media wall features blue paneling with gold trim, creating a cohesive jewel-toned palette.
Materials: Blue painted panels, blue velvet, Calacatta marble, brass/gold, herringbone wood flooring, gold pendant lighting
Style: Jewel-Toned Luxury, Classic Blue
Best for: South-facing rooms (blue stays rich in bright light), anyone wanting a bold, confident colour statement
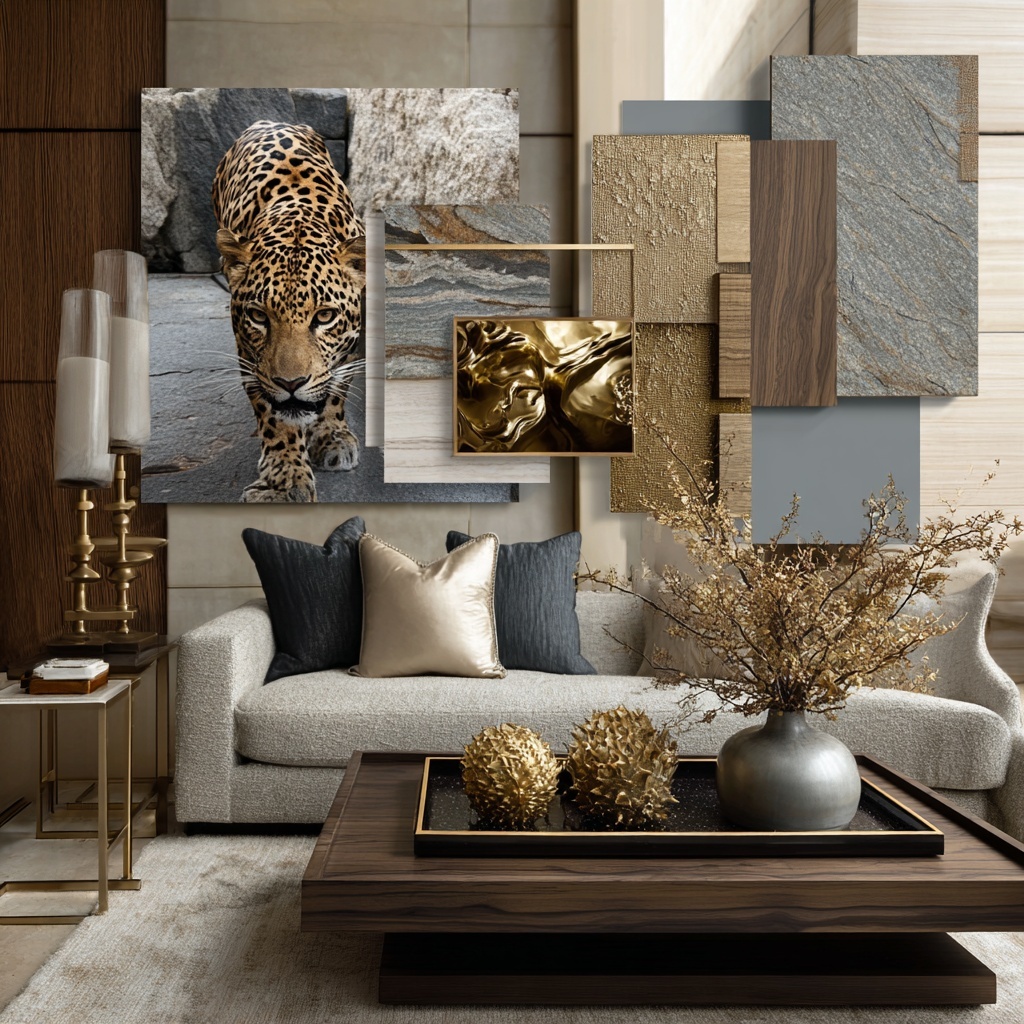
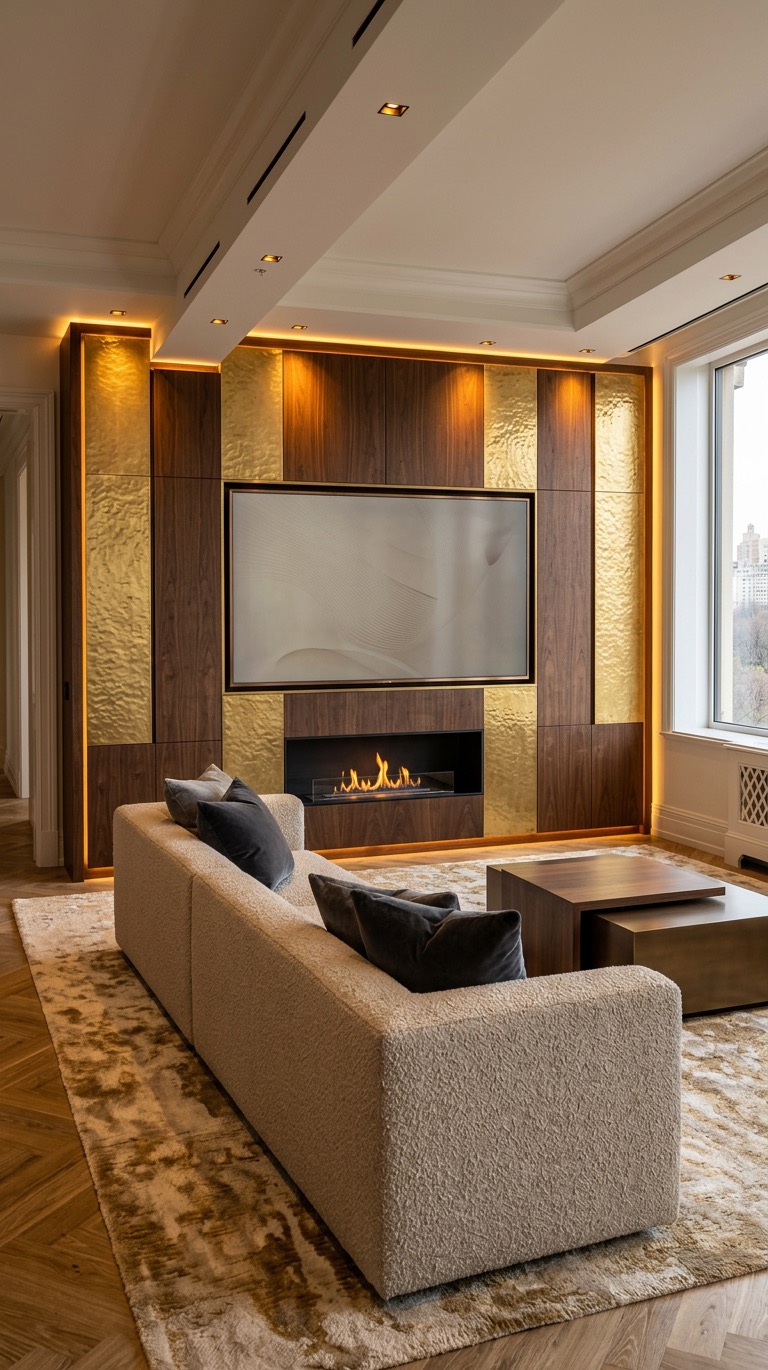
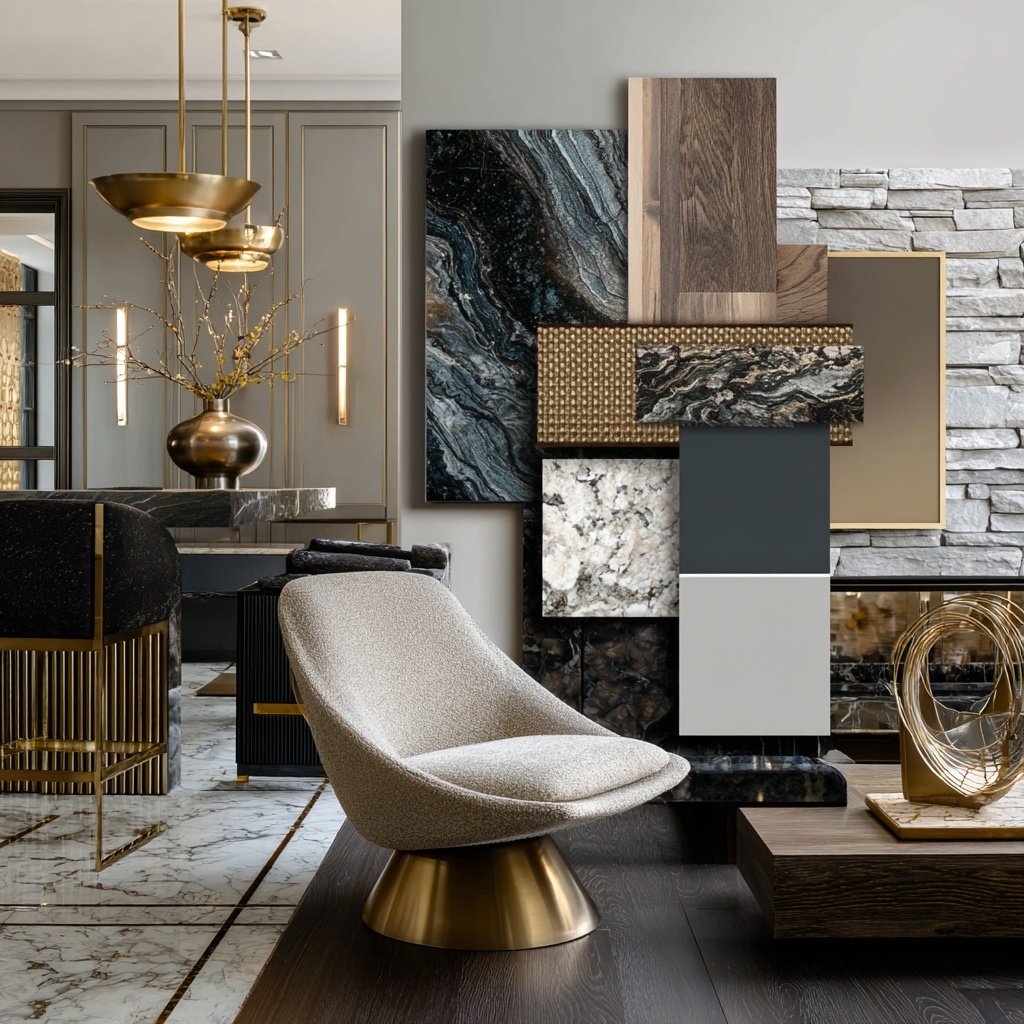
The Mood Board: Neutral beige and cream tones, leopard print elements, gold decorative accents, a light-coloured sofa, and marble surfaces. A warm, luxurious palette that balances neutral sophistication with animal print drama.
What the AI Read: Neutral wall panels, gold hardware and trim, light upholstery, marble surfaces, animal print accents, warm wood flooring, cream and beige tones, gold decorative objects.
The Result: A warm, sophisticated living room with cream walls and a light cream sofa that feels inviting and elegant. A round marble coffee table with gold accents sits in the centre, while gold pendant lighting and decorative objects echo the metallic warmth from the mood board. The media wall features neutral paneling with gold trim, creating a cohesive, polished look.
Materials: Cream plaster/panels, gold leaf/brass, cream linen or velvet, Calacatta marble, herringbone wood flooring, gold pendant lighting, animal print accents
Style: Warm Neutral Luxury, Sophisticated Contemporary
Best for: North-facing rooms (warm neutrals counteract cool light), anyone wanting luxury without bold colour
The Mood Board: Burgundy roses, deep red velvet, black marble surfaces, gold decorative accents, and dramatic moody lighting. A rich, romantic palette with burgundy as the dominant colour and gold as the luxurious accent.
What the AI Read: Burgundy wall panels, gold hardware and trim, burgundy velvet upholstery, black marble accents, dark wood flooring, dramatic lighting, rich jewel tones, metallic accents.
The Result: A rich, dramatic living room with burgundy walls and a burgundy velvet sofa that anchors the space in warmth and luxury. A dark wood coffee table with gold details sits in the centre, while gold accents throughout echo the metallic elements from the mood board. The media wall features burgundy paneling with gold trim, creating a cohesive, opulent palette.
Materials: Burgundy painted panels, gold leaf/brass, burgundy velvet, dark wood, black marble accents, herringbone wood flooring, gold pendant lighting
Style: Rich Victorian, Dramatic Luxury
Best for: North-facing rooms (burgundy stays rich in cool light), evening-focused spaces, anyone wanting a bold, romantic statement
The Mood Board: White flowers, soft pink accents, pearl strands, silver decorative objects, and white marble surfaces. A delicate, feminine palette with soft pink and white as the dominant colours and silver as the subtle accent.
What the AI Read: Pink wall panels, white and silver accents, light upholstery, white marble surfaces, soft ambient lighting, delicate feminine tones, herringbone wood flooring, fresh and airy atmosphere.
The Result: A soft, feminine living room with pink walls and a light pink or cream sofa that feels fresh and inviting. A white marble coffee table sits in the centre, while silver accents throughout add subtle sophistication. The media wall features pink paneling with white or silver trim, creating a cohesive, delicate palette. The herringbone wood floor adds warmth that prevents the pink from feeling too sweet.
Materials: Pink painted panels, silver or white hardware, light pink or cream linen, white marble, herringbone wood flooring, soft pendant lighting, pearl accents
Style: Soft Feminine, Delicate Luxury
Best for: South-facing rooms (pink stays soft in bright light), anyone wanting a feminine, calming atmosphere

The Mood Board: Green botanical elements, cream and white flowers, gold decorative accents, and natural textures. A nature-inspired palette with green as the dominant colour and gold as the luxurious accent.
What the AI Read: Green wall panels, gold hardware and trim, cream upholstery, natural textures, marble surfaces, botanical elements, herringbone wood flooring, fresh and airy atmosphere.
The Result: A fresh, botanical living room with green walls and a cream sofa that feels connected to nature and effortlessly elegant. A marble coffee table with a gold base sits in the centre, while gold accents throughout add warmth and luxury. The media wall features green paneling with gold trim, creating a cohesive, nature-inspired palette. The herringbone wood floor adds warmth and texture that grounds the space.
Materials: Green painted panels, gold leaf/brass, cream linen, Calacatta marble, herringbone wood flooring, gold pendant lighting, botanical accents
Style: Botanical Luxury, Nature-Inspired Elegance
Best for: South-facing rooms (green stays fresh in bright light), homes with garden views, anyone wanting a calm, nature-connected atmosphere
What These Examples Prove
Six completely different aesthetics. Six completely different rooms. All generated from a single mood board image and a room photo.
The AI doesn't just copy colours. It reads the materials — terracotta, velvet, marble, brass, ceramic, glass. It reads the textures — fluted, smooth, ribbed, polished. It reads the mood — warm, dramatic, fresh, classic, moody, minimal. And it translates all of that into a coherent, buildable room design.
This is the difference between a design tool and a filter. The Aspire Interiors app doesn't just change colours. It reads your aesthetic and builds a room around it.
Try It Yourself
Have a mood board that captures your aesthetic? It doesn't need to be a professional flatlay. It could be a photo from your holiday, a screenshot from Pinterest, a fabric swatch, or even a piece of art. Upload it to the Aspire Interiors app. Select "Media Wall" → "Design Full Room" → "With Inspiration." Let the AI read your mood board. Generate your room. Edit until it's perfect.
Your first 3 designs are free. No credit card. No subscription.
For more app designs, media wall inspiration, and behind-the-scenes content, visit our YouTube and TikTok pages.
Tips for Better Media Wall Designs
Start with the wall, not the TV. The media wall is the architectural feature. The TV is just one element within it. Design the wall as a system — fireplace, shelving, lighting, materials — then place the TV.
Use daylight photos. The AI reads light and shadow to understand space. A well-lit photo produces dramatically better output than a dim one.
Be specific in edits. "White marble floor" works. "Make it nicer" doesn't. The AI understands material names, not adjectives.
Generate at least three versions. The first result explores possibility. The second or third usually nails it. Don't settle for the first output.
Consider the viewing angle. The AI places the sofa facing the media wall by default. If your room has multiple seating areas or an unusual layout, mention this in the Additional Instructions field.
Think about storage. Media walls with built-in shelving look more integrated than flat panels. The AI defaults to shelving when the mood board shows layered textures — but you can explicitly request it.
Match the scale. A 3-metre media wall with a 55-inch TV looks wrong. A 4-metre wall with an 85-inch TV looks right. The AI generally scales proportionally, but always verify against real product dimensions before buying.
Common Mistakes (And How to Avoid Them)
Mistake 1: The Midnight Photo
Upload a photo taken at 10 pm with the overhead light on and flash firing. The AI interprets the yellow glare as part of your desired colour scheme. Your "warm modernism" media wall comes back looking like a hotel lobby from 2003.
Fix: Daylight. All curtains open. Flash off.
Mistake 2: The Vague Mood Board
Upload a photo of a sunset or a flower arrangement with no materials or textures. The AI has nothing to extract, so it defaults to generic grey panels and white walls.
Fix: Use a mood board with actual materials — fabric, metal, stone, wood. The AI reads textures, not emotions.
Mistake 3: Ignoring the Room's Architecture
Upload a photo that cuts off the ceiling or hides the windows. The AI doesn't know your room has 3-metre ceilings or a bay window, so it designs for a generic box.
Fix: Corner angle. Full room visible. Ceiling included.
Mistake 4: Accepting the First Result
Generate once, don't love it, conclude "AI design doesn't work." You never discover that the third generation with a tweaked brief was exactly what you wanted.
Fix: Generate three versions. Adjust your mood board or edit fields between each one.
Mistake 5: Designing for a Render, Not a Room
Generate a stunning image with a 4-metre sofa and a bespoke marble coffee table the size of a swimming pool. Show it to your builder. He laughs.
Fix: Cross-reference furniture sizes in the render against real-world products before you buy.
Mistake 6: Forgetting the 5-Element Foundation
Obsess over the media wall panels and ignore the ceiling. The AI generates a beautiful media wall... with a bare plaster ceiling and cheap skirting boards. The room looks half-finished.
Fix: The AI preserves architecture, but you need to think about the whole room. Use the Design Full Room mode, not Keep Room the Same, if you want a cohesive result.
Frequently Asked Questions
How long does it take to design a media wall with AI?
The full workflow — upload room photo, upload mood board, AI analysis, generation, two edits — takes 3–5 minutes. Each generation is 15–20 seconds. Each edit is 10–15 seconds.
Can I use any image as a mood board?
Yes. Fabric swatches, hotel lobby photos, Pinterest screenshots, magazine pages, jewellery, nature photos, paint swatches — any image with colours and textures the AI can read. The more material-focused the image, the better the extraction.
What if the AI misreads my mood board?
Every extracted field is editable before you generate. If the AI suggests "oak flooring" but you wanted "walnut," tap the field and change it. You have full control.
How many credits does this use?
Design Full Room + With Inspiration = 1 credit. Remove Furniture (optional) = 0.5 credits. Each edit after generation = 0.5 credits. The full workflow in this guide (1 generation + 2 edits) = 2 credits total.
Can I design a media wall without redesigning the whole room?
Yes. Select "Keep Room the Same" in Step 4 instead of "Design Full Room." The AI redesigns the media wall area only, preserving your existing furniture, flooring, and layout.
Does the AI preserve my room's exact dimensions?
The AI preserves architectural proportions — ceiling height, window placement, door positions, wall lengths, and overall room shape. However, always verify that furniture sizes in the generated image correspond to real-world products before purchasing.
Can I get a media wall design if I don't have a fireplace?
Yes. The AI can design media walls with or without fireplaces. If you want one, add it in the Additional Instructions field (as we did with the bioethanol burner). If you don't want one, simply don't mention it.
Can I share the design with my builder?
Yes. Tap "View" to see the clean render without UI chrome. Save the image and share it directly. The design acts as a visual brief — your builder can interpret the materials, proportions, and layout.
What styles work best for media walls?
Warm modernism is the dominant trend for 2026 — think earthy terracottas, natural walnut, brushed brass, and stone textures. But the AI handles any style: Art Deco, Scandinavian, Japanese Zen, Industrial, or Minimalist. Your mood board determines the aesthetic.
Can I use the app if my room is already furnished?
Yes. Select "Remove Furniture" (0.5 credits) in Step 4 to have the AI empty the room before designing. Or select "Keep Room the Same" to design around existing furniture.
Related Reading
- How to Design Your Room with AI: Complete Guide — The foundational guide covering all three creation modes: Bespoke, Materials, and Fixed Styles
- Best AI Room Design Tools in the UK (2026 Comparison) — See how Aspire Interiors compares to RoomGPT, VisualGPT, Canva, and Planner 5D
Ready to Design Your Media Wall?
You now know the exact process. Here's your checklist to follow along right now:
- Open the Aspire Interiors app
- Tap "Start Your Design"
- Upload a photo of your room (daylight, corner angle)
- Select "Media Wall" → "Design Full Room" → "With Inspiration"
- Upload a mood board image
- Review the AI-extracted fields, add any specifics in "Additional Instructions"
- Tap "Generate" and wait 15–20 seconds
- Drag the before/after slider. Save the result.
- Tap "Edit" to refine — flooring, wall colour, anything you want
Your first 3 designs are free. No credit card. No subscription.
Open the Aspire Interiors app and try this now →
Most people design media walls backwards. You're about to design yours forwards.
About the Team
Aspire Interiors was built by the team at AutoMazen.ai, a London-based app development company specialising in AI-powered design tools. We created Aspire Interiors because we were frustrated with design apps that generated pretty pictures with no usable framework behind them. The 17-room suite system and 5-element architectural foundation that powers the app's AI were developed through extensive research into luxury interior design trends, materials, and spatial planning — not guesswork. The media wall is the most requested feature we see, and the most commonly botched in real homes. This guide exists because we've tested what works, and we want you to get it right the first time.
Last updated: 4 June 2026. The Aspire Interiors app is available on iOS. Feature availability and credit costs are subject to change — check current pricing in the app.